Documentation
Helpful Documentation for K-State CS Textbooks
Helpful Documentation for K-State CS Textbooks
This gives the basic steps for creating a brand new Hugo textbook from scratch.
The first steps come from the Hugo Quick Start Guide
0.101.0 or higher.hugo new site <sitename>.cd <sitename>.git init.git submodule add https://github.com/ksu-cs-textbooks/hugo-theme-relearn themes/hugo-theme-relearnconfig.toml file:baseURL at the top to match the URL where the site will eventually be deployed.title to match the site’s nametheme to be just theme = ["hugo-theme-relearn"] (remove the "plausible-hugo" part)[params], update the following:editURL to match the location where files can be edited in GitLab or GitHub.author used for metadatadescription used for metadatacommitURL to match the location where individual commits can be found.[params.plausible] section - it is not used by the textbooks site.hugo serve. It will be available at the URL given in the output. If the site loads with default content, then it is working.Perform a few additional steps to make things work smoothly.
.gitignore file in the site’s base directory with the following content:/public/
/resources/_gen
.hugo_build.lock.vscode folder in the site’s base directory, and then a settings.json file inside of that directory with the following content to change the sort order of your editor’s file explorer:{
"explorer.sortOrder": "mixed"
}Once the site is working locally, set up a repository on the CS GitLab server to store the data.
README file.git remote add origin <url>git commit -m "Initial Commit" && git push -u origin main (substitute master for main if needed)
5. Make sure that you don’t commit the .hugo_build.lock file - it should be excluded via the .gitignore file created above.Now that the site is working, it is time to create some basic content.
To create a home page, create a new _index.md file in the content directory. It should have at least the following content:
+++
archetype = "home"
title = "Homepage"
+++

Lorem Ipsum
You can also create this page using the command hugo new --kind home _index.md from the site’s directory and then modifying the content a bit.
See the Hugo Theme Relearn Documentation or Hugo Documentation for more on how to use the front matter of each page.
To create a chapter, first create a folder with the chapter’s name in the content directory. We recommend including a number in front of the name to help with sorting, such as 01-introduction. Then, inside of that folder, create a new _index.md file with the following content:
+++
archetype = "chapter"
ordinal = "1"
title = "Introduction"
pre = "<b>1. </b>"
weight = 1
+++

Lorem Ipsum.
You can also create this page using the command hugo new --kind chapter 01-introduction/_index.md from the site’s directory and then modifying the content a bit.
To create a content page, simply create a file inside of the desired directory with the .md file extension. Like chapters, we recommend adding a number in front of the file name to help with sorting, such as 01-welcome.md. Place the following content in the page:
---
title: "Welcome"
pre: "1. "
weight: 1
---

Lorem Ipsum.
You can also create this page using the command hugo new 01-introduction/01-welcome.md from the site’s directory and then modifying the content a bit.
Notice that the front matter for the homepage and chapters use plus symbols +++ as delimiters, while the content pages themselves use dashes --- instead. This is done by convention in this particular theme, and we follow that in this documentation. The plus symbols +++ indicate that the front matter is written in TOML while the dashes --- indicate that the front matter is written in YAML. The biggest difference is that TOML uses the equals symbol = for assignment, while YAML uses a colon : instead. See Front Matter Formats for more information.
When creating this page using the command, it will add draft: true to the front matter. You’ll want to remove that so it appears on the site, or use hugo serve -D to include drafts files when previewing the site. It will also include the date, which can be safely removed - the theme will use the date of the latest commit to GitLab that includes this file instead.
The site right now uses a default logo based on the site’s title in config.toml. To override that, create a file at layouts/partials/logo.html in the site with the following content:
<a id="logo" href="{{ .Site.Home.RelPermalink | default ("/" | relLangURL) }}">
  Hugo Starter
</a>
Replace the text with the desired logo content. Alternatively, an image can be used. Place the image in the static/images/ folder and adapt the following HTML:
<a id="logo" href="{{ .Site.Home.RelPermalink | default ("/" | relLangURL) }}">
    <img src="/images/logo.png" alt="Logo" style="width: 100%">
</a>The sidebar footer can also be overridden by creating a file at layouts/partials/menu-footer.html. It is best to simply copy the existing content in themes/hugo-theme-relearn/layouts/partials/menu-footer.html and edit it from that template.
From there, you can continue to create additional chapters and pages as needed. For more advanced content structures, look through the source code to this site. It includes examples for page bundles, leaf bundles, hidden pages, non-printable pages, syllabus pages, video content, historical content, and more.
This gives the basic setup for a new textbook based on a starter repository.
0.101.0 or higher.git clone <url> <directory>.cd <directory>.git submodule init.git pull --recurse.config.toml file:baseURL at the top to match the URL where the site will eventually be deployed.title to match the site’s name[params], update the following:editURL to match the location where files can be edited in GitLab or GitHub.author used for metadatadescription used for metadatacommitURL to match the location where individual commits can be found.hugo serve. It will be available at the URL given in the output. If the site loads with default content, then it is working.Once the site is working locally, set up a repository on the CS GitLab server to store the data.
README file.git remote set-url origin <url>git commit -m "Initial Commit" && git push -u origin main (substitute master for main if needed)
5. Make sure that you don’t commit the .hugo_build.lock file - it should be excluded via the .gitignore file in the initial repository.The site right now uses a default logo based on the site’s title in config.toml. To override that, create a file at layouts/partials/logo.html in the site with the following content:
<a id="logo" href="{{ .Site.Home.RelPermalink | default ("/" | relLangURL) }}">
  Hugo Starter
</a>
Replace the text with the desired logo content. Alternatively, an image can be used. Place the image in the static/images/ folder and adapt the following HTML:
<a id="logo" href="{{ .Site.Home.RelPermalink | default ("/" | relLangURL) }}">
    <img src="/images/logo.png" alt="Logo" style="width: 100%">
</a>The sidebar footer can also be overridden by creating a file at layouts/partials/menu-footer.html. It is best to simply copy the existing content in themes/hugo-theme-relearn/layouts/partials/menu-footer.html and edit it from that template.
The starter repository contains all of the basic content covered in the Textbook from Scratch page.
From there, you can continue to create additional chapters and pages as needed. For more advanced content structures, look through the source code to this site. It includes examples for page bundles, leaf bundles, hidden pages, non-printable pages, syllabus pages, video content, historical content, and more.
This page gives the basic instructions for deploying a textbook to the server. It is mainly meant as a reference for the server’s administrators, but it is helpful for everyone to understand the process.
textbooks account: sudo su textbooks.textbooks user’s home directory: cd ~.git clone <url> <directory>.cd <directory>.git submodule init.git pull --recurse.textbooks account: exit.config account: sudo su config.config user’s home directory: cd ~.webhook/webhook.conf file to add a new webhook.config account: exit.sudo systemctl restart webhook.Example Webhook:
{
  "id": "hugo-starter",
  "execute-command": "/home/config/bin/deploy-101.sh",
  "command-working-directory": "/home/textbooks/hugo-starter/",
  "response-message": "Executing checkout script",
  "pass-arguments-to-command":
  [
    {
        "source": "string",
        "name": "hugo-starter"
    }
  ],
  "trigger-rule":
  {
    "match":
    {
      "type": "value",
      "value": "secret",
      "parameter":
      {
        "source": "header",
        "name": "X-Gitlab-Token"
      }
    }
  }
}
Items to configure:
id: this is the identifier for the webhook used in the URLexecute-command: see the scripts in the /home/config/bin directory.command-working-directory: this is the directory where the textbook repository is stored.deploy.sh will use the default version of Hugodeploy-101.sh will use Hugo version 0.101.0pass-arguments-to-command: this determines the folder where the content will be deployed. The name should match the URL desired (e.g. hugo-starter will deploy at https://textbooks.cs.ksu.edu/hugo-starter)trigger-rule: is used to determine if the webhook request is valid. Change the value to match the key given when setting up the webhook in GitLab.http://pacer.cs.ksu.edu:9000/hooks/<hook_id><secret>HTTP 200 at the top of the page if it is working.cd /var/www/textbooks.cs.ksu.edusudo chown -R textbooks:www-data <directory>sudo chmod -R g+w <directory>textbooks account: sudo su textbooks./var/www/textbooks.cs.ksu.edu/index.html to include a link to the new site.textbooks account: exit.config account: sudo su config.config user’s home directory: cd ~.index.html file to the nginx folder: cp /var/www/textbooks.cs.ksu.edu/index.html ~/nginx/.git to commit and push the changes to the server configuration to GitLab.webhook/webhook.conf and nginx/index.html.config account: exit.Deployment notifications are sent to a Discord server. Contact one of the other textbook authors to get access to that Discord server. It is helpful if you want to see that your deployments are starting and completing correctly.
Deployment logs are stored in the /home/textbooks/<name>.log file. This can be helpful for debugging.
From time to time, the underlying Hugo Theme Relearn clone may be updated. This page gives the directions for updating your textbook to the latest theme.
themes/hugo-theme-relearn directory: cd themes/hugo-theme-relearn.main branch of the theme if you haven’t already: git checkout main.git pull.cd ../../.hugo serve.git commit -m "Update Theme" && git pushmodified: themes/hugo-theme-relearn (new commits) when running git status to confirm that the theme is being updated.To provide extra security, you can also set up a live backup of your textbook to be hosted on GitHub. This page gives the instructions for setting this up.
https://ksu-cs-textbooks.github.io/<repo_name>)ssh:// to the front of the repository, and also change the colon between the hostname and the organization name to a slash /.git@github.com:ksu-cs-textbooks/hugo-starter.git becomes ssh://git@github.com/ksu-cs-textbooks/hugo-starter.gitmain or master branch will be mirrored.Once that is done, you’ll need to add an SSH public key to your GitHub Account.

In order to properly build the backup site on GitHub, several changes must be made to the existing website directory.
.github to store GitHub specific configuration files..github/workflows/gh-pages.yml with the following content:# https://github.com/peaceiris/actions-hugo
name: GitHub Pages
on:
push:
branches:
- main # Set a branch to deploy
pull_request:
jobs:
deploy:
runs-on: ubuntu-20.04
concurrency:
group: ${{ github.workflow }}-${{ github.ref }}
steps:
- uses: actions/checkout@v3
with:
submodules: true # Fetch Hugo themes (true OR recursive)
fetch-depth: 0 # Fetch all history for .GitInfo and .Lastmod
- name: Setup Hugo
uses: peaceiris/actions-hugo@v2
with:
hugo-version: '0.101.0'
# extended: true
- name: Build
run: hugo -b "https://ksu-cs-textbooks.github.io/hugo-starter"
- name: Deploy
uses: peaceiris/actions-gh-pages@v3
if: ${{ github.ref == 'refs/heads/main' }}
with:
github_token: ${{ secrets.GITHUB_TOKEN }}
publish_dir: ./publicUpdate the -b "https://ksu-cs-textbooks.github.io/hugo-starter" to match the URL where the site will be deployed (e.g. https://ksu-cs-textbooks.github.io/<repo_name>)
Update the two instances of main to master if needed to match your repository configuration. You can also update the value of the hugo-version variable to match your desired Hugo version.
For more advanced configuration, copy config.toml to github.toml and then edit that file to update the baseURL and other settings. Update the command to hugo --config github.toml to use that configuration file for deployment on GitHub.
.github/dependabot.yml with the following content:version: 2
updates:
# Maintain dependencies for GitHub Actions
- package-ecosystem: "github-actions"
directory: "/"
schedule:
interval: "daily"
# Git Submodules
- package-ecosystem: "gitsubmodule"
directory: "/"
schedule:
interval: "daily"This will help keep any underlying GitHub actions updated, and it will also send emails when the theme has been updated.
Now that the site has the required GitHub configuration, we need to set up GitHub Pages to deploy the rendered site.
gh-pages action. You can click the Actions tab on GitHub to see that the action completed successfully.gh-pages branch and the / (root) folder, then click Save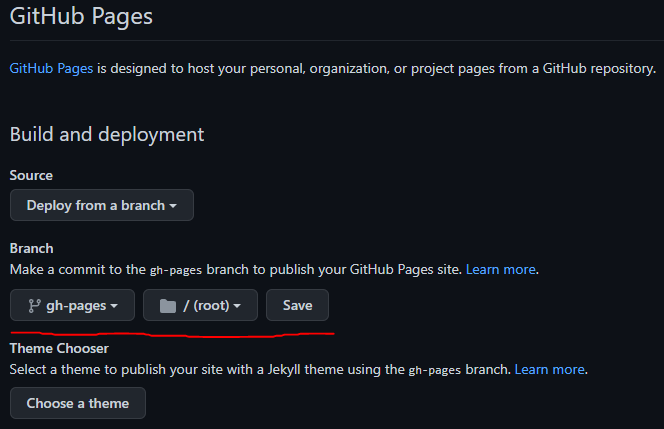
The textbook backups are listed on the homepage available at https://ksu-cs-textbooks.github.io/. That page can be updated by editing this index.html page in the base repository. Anyone who is an owner of the group should be able to edit it. When you commit an edit to that page, it will automatically deploy and update.
This page gives instructions for switching an existing textbook using the previous theme to the new version of Hugo Theme Relearn. Only use these instructions once per textbook!
The new theme requires Hugo version 0.101.0 or higher. Install Hugo from the Hugo Releases.
Install the new theme as a git submodule:
git submodule add https://github.com/ksu-cs-textbooks/hugo-theme-relearn.git themes/hugo-theme-relearnconfig.toml to config.toml.bak as a backup.config.toml with the content from the config.toml from the starter site.config.toml to match the desired site configuration (refer to the config.toml.bak as needed).baseURL at the top to match the URL where the site will eventually be deployed.title to match the site’s name[params], update the following:editURL to match the location where files can be edited in GitLab or GitHub.author used for metadatadescription used for metadatacommitURL to match the location where individual commits can be found.config.toml.bak file.Depending on how the site is used, the following other configuration updates must be made.
If the site is set up for GitHub backups, there are two options:
github.toml is present, and you’d like to continue using multiple configuration files, replace it with the current contents of the config.toml file and update the baseURL to match what was previously in the github.toml file (e.g. https://ksu-cs-textbooks.github.io/<repo_name>). Ensure that the hugo command in .github/workflows/gh-pages.yml is hugo --config github.toml so that the correct file will be used.github.toml is not present, or you’d like to simplify the configuration, set the hugo command in the .github/workflows/gh-pages.yml file to be hugo -b "https://ksu-cs-textbooks.github.io/<repo_name>" and update <repo_name> to match the correct URL. This will use the config.toml file but override the baseURL when building it.In addition, you should confirm that the hugo-version setting in .github/workflows/gh-pages.yml is set to 0.101.0.
If the site is set up to build Docker images, there are two options:
docker.toml is present, and you’d like to continue using multiple configuration files, replace it with the current contents of the config.toml file and update the baseURL to match what was previously in the docker.toml file (e.g. https://<name>.textbooks.cs.ksu.edu). Ensure that the hugo command in the Dockerfile is hugo --config docker.toml so that the correct file will be used.docker.toml is not present, or you’d like to simplify the configuration, set the hugo command in the Dockerfile to be hugo -b "https://<name>.textbooks.cs.ksu.edu" and update <name> to match the correct URL. This will use the config.toml file but override the baseURL when building it.In addition, you should confirm that the HUGO_VERSION argument in the Dockerfile is set to 0.101.0.
Finally, since we aren’t currently using Docker images yet, you may wish to configure your textbook to only create a Docker image when a new tag is pushed, or disable this completely for the time being. See the Docker Container page for more information.
If the site has overridden any layouts in the layouts folder, they should be reviewed and updated as needed.
layouts/partials/logo.html - the default logo will use the title from the config.toml file as a clickable link. If this is desired, then delete layouts/partials/logo.html. Otherwise, update it using the following templates as a guide:Static Text
<a id="logo" href="{{ .Site.Home.RelPermalink | default ("/" | relLangURL) }}">
  Hugo Starter
</a>
Logo Image
<a id="logo" href="{{ .Site.Home.RelPermalink | default ("/" | relLangURL) }}">
    <img src="/images/logo.png" alt="Logo" style="width: 100%">
</a>
layouts/partials/menu-footer.html - the default menu footer gives information about the site and the CC-BY-NC-SA license. If this is desired, then delete the layouts/partials/menu-footer.html from the site. Otherwise, update it using the following templates as a guide (change only the second paragraph to your desired license information).The footer works best with a bit of inline HTML to fix the design. I left it this way since it was easier to override than trying to adjust it in the base theme, since updates to the base theme’s CSS may cause issues.
Default Footer
<style>
#footer {
	font-size: 13px;
	margin-left: auto;
	margin-right: auto;
	padding: 2rem 1rem;
	min-width: 230px;
	max-width: 300px;
}
#footer p {
	margin: 0;
}
</style>

<p>Built using <a href="http://gohugo.io/">Hugo</a> and <a href="https://github.com/ksu-cs-textbooks/hugo-theme-relearn">Hugo Relearn Theme</a>.</p>
<p><a rel="license" href="http://creativecommons.org/licenses/by-nc-sa/4.0/"><img alt="Creative Commons License" style="border-width:0; margin: .5rem auto" src="https://i.creativecommons.org/l/by-nc-sa/4.0/88x31.png" /></a><br />This work is licensed under a <a rel="license" href="http://creativecommons.org/licenses/by-nc-sa/4.0/">Creative Commons Attribution-NonCommercial-ShareAlike 4.0 International License.</a></p>
CC Course Footer with License and Attribution Info
<style>
#footer {
    font-size: 13px;
    margin-left: auto;
    margin-right: auto;
    padding: 2rem 1rem;
    min-width: 230px;
    max-width: 300px;
}
#footer p {
    margin: 0;
}
</style>

<p>Built using <a href="http://gohugo.io/">Hugo</a> and <a href="https://github.com/ksu-cs-textbooks/hugo-theme-relearn">Hugo Relearn Theme</a>.</p>
<p><a rel="license" href="http://creativecommons.org/licenses/by-nc-sa/4.0/"><img alt="Creative Commons License" style="border-width:0; margin: .5rem auto" src="https://i.creativecommons.org/l/by-nc-sa/4.0/88x31.png" /></a><br />This work is licensed under a <a rel="license" href="http://creativecommons.org/licenses/by-nc-sa/4.0/">Creative Commons Attribution-NonCommercial-ShareAlike 4.0 International License.</a> See <a href="https://core.cs.ksu.edu/license">License & Attribution</a> for details.</p>By default, the site will now create a printable version of all pages. To remove a page or group of pages from the printed view (such as announcements or assignments pages), add noprint = true (TOML) or noprint: true (YAML) to the front matter of a page or chapter. Any pages beneath that page in the tree will not be included in the print view. By default, all hidden pages will also not be included (but they also won’t be visible in the sidebar menu).
The template no longer includes code for the section: true front matter option - it should be switched to chapter: true to get the chapter header formatting, otherwise it can be removed entirely.
The date option is no longer used. It can be deleted or ignored.
See the Hugo Theme Relearn Documentation or Hugo Documentation for more on how to use the front matter of each page.
This may be an incomplete list of front matter changes - if you run into additional front matter issues when upgrading, let me know and I’ll update this document.
Hugo Theme Relearn changed the way that LaTeX math is handled in markdown. Now it is best to either include it in a shortcode or a code fence instead of just using dollar signs $ directly in the markdown. See the Hugo Theme Relearn Documentation for additional details.
In general, any inline LaTeX using single dollar signs $ should be wrapped with the new math shortcode, as in $e^x$.
For multiline LaTeX using two dollar signs $$, use the math codefence:
Click here for Complete Shortcode Documentation. The following shortcodes should be reviewed for updates:
syllabus - this is a new shortcode to replace the previous include shortcodes for default syllabus statements. See the Syllabus Shortcode Documentation for how to use it.quizdown - this is an implementation of the Quizdown plugin to add short quizzes to the site.include - this shortcode should now use the < > delimiters instead of % %. Using < > will prevent the Markdown renderer from rendering the content twice, resulting in extra spacing around URLs and other strange formatting issues. See Shortcodes for more information on the different shortcode delimiters. See Custom Include Shortcode Documentation and Default Include Shortcode Documentation for more details on the shortcode itself. It should now support other shortcodes in included files! I recommend running a quick search for something like {% include and {%include to catch most of these and review them on the rendered site before committing.If you are including files from the previous theme, such as the default syllabus statements, you should update the path to the new theme or consider using the new syllabus shortcode for this.
notice - this shortcode has many new features, and the syntax for it is slightly different (only if you were using custom titles or icons - the base notice shortcode hasn’t changed). See Noiframe Notice Shortcode Documentation and Notice Shortcode Documentation for more information.link - the link shortcode has been removed. Now, the default HTML renderer is configured to have a link either open in the same tab if it is a local link (does not have http in the URL), otherwise it will open in a new tab if the link goes to an external site. See Link Shortcode for more information. All links can now be converted to standard Markdown syntax [Link Name](link_url) or replaced with an HTML <a href="link_url" target="_blank" rel="noopener">Link Name</a> tag. You may also want to review the relref function in Hugo to generate relative links to pages within the site that use the correct base URL.norender - the norender shortcode has been removed. It can be replaced by enclosing the content in a <pre> </pre> HTML element.static - the static shortcode has been removed. Any files in the /static folder within the site are now accessible using direct URLs. For example, a file at /static/images/logo.png can be included using . As long as the baseURL and canonifyURLs settings in config.toml are correct, Hugo will automatically update these URLs to the correct path.This may be an incomplete list of shortcode changes - if you run into additional shortcode issues when upgrading, let me know and I’ll update this document.
At this point, you should preview the content in your site using hugo serve and ensure that it looks correct. If everything is working properly, then continue. If not, feel free to contact the theme maintainer for assistance.
As of August 2022, the server has not been updated to use a newer version of Hugo by default. Therefore, before deploying an updated site, contact one of the server administrators to have your site’s webhook updated to use the deploy-101.sh deployment script, which uses the new version of Hugo.
If everything is working correctly, you should be able to commit and push. Make sure that everything has deployed and updated properly. You may have to clear your browser’s cache using CTRL+F5 or CMD+F5 to get the latest version of the CSS file.
If anything doesn’t look correct, contact the theme maintainer for assistance.
Once everything is working properly, you should remove the old theme from your repository using these commands:
git rm themes/ksucs-hugo-theme
rm -rf .git/modules/themes/ksucs-hugo-theme
git config --remove-section submodule.themes/ksucs-hugo-theme
After making those changes, commit and push.
After updating the textbook on one system, it is recommended to delete and re-clone the repository on any other systems that are using it. That will give the cleanest version of the updated repository without any residual files from the previous theme. Run these commands starting outside of the site’s directory, where <directory> is the directory containing the site.
rm -rvf <directory>
git clone <url> <directory>
cd <directory>
git submodule init
git pull --recurseThe instructions to clone an existing textbook are simple, but require a few extra steps compared to a normal git repository setup.
The basic version is to run these commands, where <directory> is the directory where the site should be stored:
git clone <url> <directory>
cd <directory>
git submodule init
git pull --recurse
These commands do the following:
git clone <url> <directory> will clone the existing git repository at <url> into the local directory <directory>.cd <directory> will change the current working directory to be the directory where the site is stored.git submodule init will initialize the submodules for this repository. We use git submodules to keep track of the theme and make it easy to update the theme as needed.git pull --recurse will pull the latest version of the repository AND the theme. The theme will be locked to a specific version unless you go through the steps to Update the Theme.The Hugo textbooks can also be deployed into a Docker container.
Dockerfile in the site’s base directory with the following content:FROM nginx:alpine as build
RUN apk add --update \
wget git
ARG HUGO_VERSION="0.101.0"
RUN wget --quiet "https://github.com/gohugoio/hugo/releases/download/v${HUGO_VERSION}/hugo_${HUGO_VERSION}_Linux-64bit.tar.gz" && \
tar xzf hugo_${HUGO_VERSION}_Linux-64bit.tar.gz && \
rm -r hugo_${HUGO_VERSION}_Linux-64bit.tar.gz && \
mv hugo /usr/bin
COPY ./ /site
WORKDIR /site
RUN hugo -b "https://hugo-starter.textbooks.cs.ksu.edu"
#Copy static files to Nginx
FROM nginx:alpine
COPY --from=build /site/public /usr/share/nginx/html
WORKDIR /usr/share/nginx/htmlHUGO_VERSION argument should be set to the version of Hugo used for the site.RUN command should include the URL that the site will be deployed to after the -b flag. Alternatively, copy config.toml to docker.toml and update the baseURL setting (as well as any other settings as desired), and use RUN hugo --config docker.toml instead.You can find more information on setting up a Dockerfile in the Dockerfile Reference.
Docker images can be built using GitLab. The organization or repository on GitLab must be configured with a GitLab Runner. This has already been done in most GitLab organizations on the CS GitLab server that contain textbooks.
.gitlab-ci.yml in the site’s base directory with the following content:image: docker:20.10.11
variables:
# When using dind service, you must instruct docker to talk with the
# daemon started inside of the service. The daemon is available with
# a network connection instead of the default /var/run/docker.sock socket.
#
# The 'docker' hostname is the alias of the service container as described at
# https://docs.gitlab.com/ee/ci/docker/using_docker_images.html#accessing-the-services
#
# If you're using GitLab Runner 12.7 or earlier with the Kubernetes executor and Kubernetes 1.6 or earlier,
# the variable must be set to tcp://localhost:2375 because of how the
# Kubernetes executor connects services to the job container
# DOCKER_HOST: tcp://localhost:2375
#
DOCKER_HOST: tcp://docker:2375
#
# This instructs Docker not to start over TLS.
DOCKER_TLS_CERTDIR: ""
#
# Checkout submodules recursively
GIT_SUBMODULE_STRATEGY: recursive
services:
- docker:20.10.11-dind
before_script:
- docker info
- docker login -u $CI_REGISTRY_USER -p $CI_REGISTRY_PASSWORD $CI_REGISTRY
build-latest:
stage: build
only:
- tags
script:
- docker pull $CI_REGISTRY_IMAGE:latest || true
- docker build --cache-from $CI_REGISTRY_IMAGE:latest --tag $CI_REGISTRY_IMAGE:$CI_COMMIT_SHA --tag $CI_REGISTRY_IMAGE:latest .
- docker push $CI_REGISTRY_IMAGE:$CI_COMMIT_SHA
- docker push $CI_REGISTRY_IMAGE:latest
# build-branches:
# stage: build
# except:
# - master
# - main
# script:
# - docker pull $CI_REGISTRY_IMAGE:$CI_COMMIT_BRANCH || true
# - docker build --cache-from $CI_REGISTRY_IMAGE:latest --tag $CI_REGISTRY_IMAGE:$CI_COMMIT_SHA --tag $CI_REGISTRY_IMAGE:$CI_COMMIT_BRANCH .
# - docker push $CI_REGISTRY_IMAGE:$CI_COMMIT_SHA
# - docker push $CI_REGISTRY_IMAGE:$CI_COMMIT_BRANCHbuild-latest job, it uses - tags under the only heading. This will only build a Docker container when a new tag is pushed. This reduces the number of containers built, since it is a time-consuming job. You can change this to the following to have it build anytime changes are made to the main or master branches:only:
- main
- masterbuild-branches job is commented out. This will build a Docker container for each branch that is tagged using the branch name. This can be uncommented if you’d like to build Docker containers based on a branch. (Likewise, the except section can be replaced with an only section to target specific branches.)More information on the GitLab CI file can be found in the GitLab Documentation
You should also enable package cleanup in GitLab by going to the Settings -> Packages and Registries menu in the repository and turning on Clean Up Image Tags. This will clean up all tags older than 90 days, except for the last 10 tags. The latest tag will be kept indefinitely until replaced by a new version. This will help save space on GitLab as images are built and replaced.
Docker images can be built using GitHub.
.github/worflows/docker-image.yml with the following content:name: Docker Image CI
on:
push:
tags:
- "v*.*.*"
jobs:
build:
runs-on: ubuntu-latest
steps:
- uses: actions/checkout@v3
with:
submodules: recursive
fetch-depth: 0
- name: Login to GitHub Container Registry
uses: docker/login-action@v1
with:
registry: ghcr.io
username: ${{ github.repository_owner }}
password: ${{ secrets.GITHUB_TOKEN }}
- name: Build and push
uses: docker/build-push-action@v2
with:
context: .
push: true
tags: |
ghcr.io/${{ github.repository}}:latestpush heading, it is configured to run this only when a new tag is pushed that matches Semantic Versioning structure. You can change this to the following to have it build anytime changes are made to the main or master branches:push:
branches: [ master, main ]This can also be configured to send notifications to Discord on a successful deployment, and it can also trigger a webhook after deployment. See this example for how to configure those options. It requires creation of GitHub Action Secrets for the Discord webhook and deployment webhook.
More information can be found on the GitHub Actions Documentation.
As of this writing, GitHub will store all previous versions of this package, and there is no automatic way to delete older packages outside of using another GitHub action. So, if you choose to go this route, you may have to deal with manually cleaning up old packages at some point in the future if you run out of space on GitHub.
In Summer 2023 this theme was updated to match version 5.18.0 of the base Hugo Relearn Theme
A full list of changes to the theme can be found on the What’s New page and in the Documentation.
Some notable feature updates:
Currently the template will sometimes include hidden pages in the menu when using hugo serve locally, but this does not affect any deployed versions of the site. To resolve this problem, disable fast rendering using hugo serve --disableFastRender.
To upgrade to the new theme version, do the following:
themes/hugo-theme-relearn directorygit pull to pull the latest version of the themethemes/hugo-theme-relearn submodule.To enable the new search features, update the [outputs] section of the config.toml (and other files like docker.toml and github.toml if present) to the following:
[outputs]
  home = ["HTML", "RSS", "PRINT", "SEARCH", "SEARCHPAGE"]
  section = ["HTML", "RSS", "PRINT", "TELE", "EMBED"]
page = ["HTML", "RSS", "PRINT", "TELE", "EMBED"]To enable automatically detecting theme variants based on the user’s OS preferences, find the themeVariant item under [params] in the config.toml (and other files like docker.toml and github.toml if present) and replace that line with the following:
  themeVariant = ["auto", "light-theme", "dark-theme"]
  # The first element is the variant for light mode, the second for dark mode
themeVariantAuto = ["light-theme", "dark-theme"]Many of the previous textbooks use the old method for creating chapters by placing chapter = true in the frontmatter. This has been deprecated in favor of using the new archetype = "chapter" setting. See the documentation for details.
Unfortunately, the way that the new archetype system assigns chapter numbers is using the weight parameter. Many of our books use non-sequential weights to make it simpler to add pages later. This theme adds support for an ordinal value in the frontmatter to allow overriding this value.
To get rid of the deprecation warnings, find all pages that contain chapter = true and make the following updates:
chapter = true with archetype = "chapter" in the page’s frontmatterh1 and h3 header. These are now generated by the archetype.ordinal = "X" line to the frontmatter, and replace the X with the chapter number.For example, a chapter with the following content:
+++
title = "Basic Content"
weight = 5
chapter = true
pre = "<b>0. </b>"
+++

### Chapter 0

# Basic Content

The Basics of this Template
should be updated to match this format:
+++
title = "Basic Content"
weight = 5
ordinal = "0"
archetype = "chapter"
pre = "<b>0. </b>"
+++

The Basics of this TemplateIn Summer 2024 this theme was updated to match version 6.0.0 of the base Hugo Relearn Theme
A full list of changes to the theme can be found on the What’s New page and in the Documentation.
Some notable feature updates:
config.toml to hugo.toml to match Hugo changeshugo.tomlIn addition, the theme now supports installation via Hugo Modules as well as Git Submodules. We plan to migrate all textbooks to a Hugo Modules setup since it is more portable and easy to configure. More Information.
To Upgrade the theme and switch from a Git Submodule to a Hugo Module, do the following:
hugo mod init cis598-textbook. This should create a file go.mod listing the name of the module and the version of go used.hugo.toml file and doesn’t need to be configured.git rm themes/hugo-theme-relearn. This should remove that directory as well as update the .gitmodules file to remove the submodule. If desired, also delete the themes directory itself using rmdir themes.hugo.toml using this sample file as a template.# TODO changeme to see what settings should be updated for each site. Many settings can be carried over from the existing config.toml but some settings are new. Configuration Documentation.TODO and other keywords, making them easy to find.textbooks.cs.ksu.edu/cis598). The canonifyURLs setting is deprecated and should be set to false, along with the relativeURLs setting set to false. This may break some image links - see below.hugo.toml, delete the existing config.toml as it is no longer needed.hugo mod get -u. This should install the module and create a file go.sum that includes the checksums of the module dependencies.hugo mod get to get the current version specified, or hugo mod get -u to update the version to the latest in GitHub.hugo serve or hugo build will also install the module if needed.Dockerfile, .github/workflows/gh_pages.yml, .gitlab-ci.yml or similar and update the version of Hugo to v0.126.1.Before testing the site, there are a few content changes that must be made.
ref and relref shortcodeIn newer versions of Hugo, the ref and relref shortcode must be delimited using % % instead of < >. Many of our textbooks use the old delimiter. This will result in errors such as this when building the textbook:
ERROR "/home/russfeld/web/cis598-textbook/content/0-introduction/01-syllabus/_index.md": link 'HAAHUGOSHORTCODE14s0HBHB' is not a page
WARN  "/home/russfeld/web/cis598-textbook/content/b-schedule/01-fall2022.md": WARNING you must call the ref / relref shortcode with '% %' instead of '< >' to work correctly for the anchor target attribute
To fix this, the following regex find/replace can be used in VS Code:
Search:
\{\{<\s*(rel)?ref ([^>]*)\s*>\}\}Replace:
{{% $1ref $2 %}}These errors can be switched to warnings in hugo.toml but it is best to deal with them directly so they don’t cause problems in the future.
youtube shortcodeThe youtube shortcode may also need to be updated as described above, but in the other direction.
To fix this, the following regex find/replace can be used in VS Code:
Search:
\{\{%\s*youtube (.*)\s*%\}\}Replace:
{{< youtube $1 >}}Newer versions of Hugo can also verify the path of any images and resources included in the page. This is helpful for finding broken links or missing images. Unfortunately, it cannot verify any items stored in the static directory since it is not processed through the content pipeline. Many of our textbooks store all images and resources in the static folder, which is fine, but it means that the build process cannot verify that there aren’t any missing items or broken links.
To fix this, there are a few options:
hugo.toml, the errors can be switched to warnings or disabled entirely. By default, all checks are set to error except for images, which are set to warning. Read the documentation in hugo.toml to determine what options are preferred.static folder can be moved to the assets folder. Ideally the links won’t need to be changed if the images are linked using an absolute reference path (e.g. images/1/image.png). This is the simplest fixstatic folder can be moved to the content folder near the page where they are used. It is recommended to convert any standalone pages to page bundles that contain the page and all associated resources.For example, the CIS 598 textbook contains a page 01-fall2022.md that contains links to many images in the static folder:
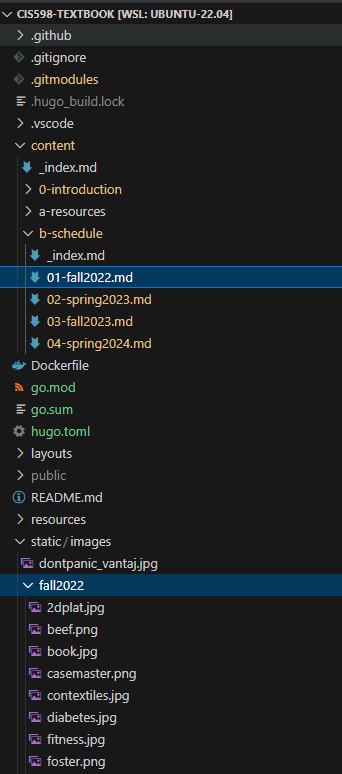
To switch this to a page bundle, create a folder 01-fall2022 and then move the 01-fall2022.md file inside of that folder and rename it to index.md. Then, create an images folder within, and move all of the images from static to the new folder. The resulting layout should be:
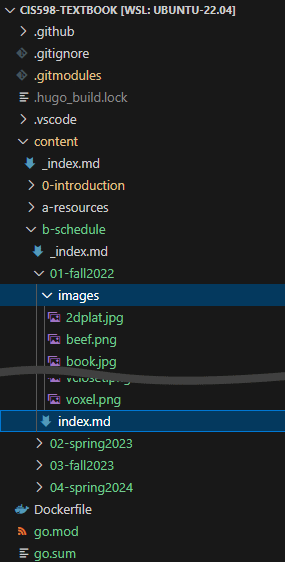
Using this method, all image links on the page can be updated by a quick find and replace to replace /images/fall2022/ with just images/ - removing the leading slash / and the subfolder name used in the old static/images path.
Disabling the canonifyURLs option will break all image links in any Reveal.js slides that are using the /images path prefix. The previous behavior would simply prepend the subdirectory in front of any URL starting with a /.
There are two workarounds:
/images/ path in the slides and prepend the subdirectory to the path, as in /cis598/images/. This works as long as the site baseURL is not changed. This requires the images to remain in the static folder unless they are referenced by other markdown files. Generally I just copy images from static to assets to fix the problem above but leave a copy in the static folder as well. Hugo will merge the two./images URLs to be ../images (or whatever relative path is correct). The ref and relref shortcodes cannot be used in this context. This works regardless of the site baseURL setting.If the site includes an image in the layouts/partials/logo.html page, you can suppress the error by loading the image as a resource from the assets directory instead of the static directory.
{{/* Place Logo Graphic or Text Here */}}
{{ $image := resources.Get "images/cc410logo.png" }}
<a id="logo" href="{{ .Site.Home.RelPermalink | default ("/" | relLangURL) }}">
    <img src="{{ $image.RelPermalink }}" alt="Computational Core Logo" style="width: 100%">
</a>In Summer 2025 this theme was updated to match version 8.0.0 of the base Hugo Relearn Theme
The new version of the theme was tested on Hugo v0.148.1 or later. I recommend updating your Hugo installation (either locally or by updating the devcontainer configuration and rebuilding).
A full list of changes to the theme can be found on the What’s New page and in the Changelog.
Some notable feature updates:
.devcontainer/devcontainer.json. After updating, you’ll need to rebuild the devcontainer to get the new version of Hugo..github/workflows/gh-pages.ymlhugo versionhugo mod get -uhugo.toml using this sample file as a template.# TODO changeme to see what settings should be updated for each site. Many settings can be carried over from the existing config.toml but some settings are new. Configuration Documentation.hugo serve