This is an adaptation of Hugo Relearn Theme that has been customized for use by K-State Computer Science to build online textbooks. It contains some features that are specifically designed for our use case, but they may be useful to others.
Fonts and layouts customized to match K-State’s websites and color scheme, as well as Instructure Canvas.
Each page generates an embeddable version that strips menus, headers and footers (add /embed.html to almost any URL). This is meant to be embedded in an iFrame within another page, such as an HTML wiki page in Canvas.
By doing so, we can embed course content in Canvas while editing it via Hugo, taking advantage of tools such as git for versioning. In addition, by updating the source website, all versions of the course in Canvas are updated immediately.
Each page also generates a teleprompter version to allow creation of course videos (add /tele.html to almost any URL). Many pages are used as a video script for multi-modal learning.
The teleprompter pages include auto-scroll capabilities. It is compatible with an IKAN Teleprompter Remote, but can be controlled using the number keys or easily customized. See /static/js/tele-scroll.js for details.
Subsections of K-State CS Hugo Theme
Basic Content
The Basics of this Template
Subsections of Basic Content
Section
A subsection example.
Subsections of Section
Simple Page
This is a simple Hugo page. It supports all Markdown formatting.
Simple Page
This is a simple Hugo page. It supports all Markdown formatting.
This theme includes a special template for developing presentations using Reveal.js.
To do this, there are a few steps:
Create an html file with the .html file extension
Use the following frontmatter:
---
type: "reveal"hidden: true---
In that file, write the contents of the Reveal.js presentation. Each slide should be contained in a <section> tag.
The contents of each slide is simply HTML, and pretty much any standard HTML tag can be used. Custom CSS can also be added via the style attribute on individual elements.
When editing the slides, it is recommended to manually update the highlighting used by your preferred editor to HTML. This is relatively simple to do in Atom or Notepad++.
Examples
Below are some example slides to show the formatting that can be done in this presentation. Each slide is present in the Slides page.
Simple Title Slide
<section>
<h2>Welcome to the</h2>
<imgclass="plain stretch"src="/images/core-logo-on-white.svg">
<h2>trial course!</h2>
</section>
The image uses the stretch class, which is detailed below.
The stretch class applied to the image will stretch that image to fill all available space in the slide. Only one image may have the stretch class applied on any given slide. So, in this case, the height of one image is set manually to 40%, and the other is allowed to stretch and fill the remaining part of the slide.
The plain class simply removes any adornment (borders, shading, etc.) from the image. I prefer them that way.
There is a custom imagecredit class defined in the CSS that can be used to give credit for images in a way that is unobtrusive to the presentation.
Tables should use the special reveal class for formatting.
Code
Code can be included in slides using the <pre> and <code> tags. Code highlighting is controlled by the class attached to the <code> tag (or inferred from context), while the size of the text is best controlled by the style in the <pre> tag. The stretch class can also be used to ensure a code block fills the available space, avoiding the need for scrollbars.
Java
<section>
<preclass="stretch"style="font-size: 0.5em;"><codeclass="java">// Load required classes
import java.util.Scanner;
import java.io.File;
public class Conditionals{
public static void main(String[] args) throws Exception{
// Scanner variable
Scanner reader;
// If an argument is present, we are reading from a file
// specified in args[0]
if(args.length > 0){
reader = new Scanner(new File(args[0]));
// If no argument, read from System.in
}else{
reader = new Scanner(System.in);
}
int x = reader.nextInt();
System.out.println(x);
}
}</code></pre>
</section>
Python
<section>
<preclass="stretch"style="font-size: 0.7em;"><codeclass="python"># Load required modules
import sys
# If an argument is present,
# we are reading from a file
# specified in sys.argv[1]
if len(sys.argv) > 1:
reader = open(sys.argv[1])
# If no argument, read from stdin
else:
reader = sys.stdin
x = int(reader.readline())
print(x)</code></pre>
</section>
Multiple Divs
The slides can also include multiple <div> tags to separate content.
<section>
<divstyle="float: right; width: 70%">
<preclass="stretch"style="font-size: .37em"><codeclass="java">// Load required classes
import java.util.Scanner;
import java.io.File;
public class Example{
public static void main(String[] args){
// Scanner variable
<mark>Scanner reader;</mark>
// If an argument is present,
// we are reading from a file
// specified in args[0]
<mark>if(args.length > 0){
reader = new Scanner(new File(args[0]));</mark>
// If no argument, read from System.in
<mark>}else{
reader = new Scanner(System.in);
}</mark>
/* -=-=-=-=- MORE CODE GOES HERE -=-=-=-=- */
}
}</code></pre>
</div>
<divstyle="width: 30%">
<pstyle="font-size: .7em">Write a program that accepts a positive integer that represents a year...</p>
</div>
</section>
The example below includes a <div> of text that is shown to the left, and a <div> of code shown to the right. We use the attribute style="float: right; width: 70%" applied to the first div to move it to the right and give it a fixed width. The second div should also have a fixed width attached to it.
Note that the stretch class applied to the code in the rightmost div only stretches the code within that div. Pretty handy!
Marking Text
We can mark (highlight) text in our slides using the <mark> tag:
<section>
<divstyle="float: right; width: 70%">
<preclass="stretch"style="font-size: .5em"><codeclass="java">
</code></pre>
</div>
<divstyle="width: 30%">
<pstyle="font-size: .7em">Write a program that accepts a positive <mark>integer that represents a year</mark>...</p>
</div>
</section>
<section>
<divstyle="float: right; width: 70%">
<preclass="stretch"style="font-size: .5em"><codeclass="java"><mark>int year = reader.nextInt();</mark>
</code></pre>
</div>
<divstyle="width: 30%">
<pstyle="font-size: .7em">Write a program that accepts a positive <mark>integer that represents a year</mark>...</p>
</div>
</section>
<section>
<divstyle="float: right; width: 70%">
<preclass="stretch"style="font-size: .5em"><codeclass="java">int year = reader.nextInt();
</code></pre>
</div>
<divstyle="width: 30%">
<pstyle="font-size: .7em">Write a program that accepts a <mark>positive integer</mark> that represents a year...</p>
</div>
</section>
The three slides listed above each mark a different part of the text and code. This allows us to incrementally build a program by marking parts of the code as we discuss them.
Advanced Structures
More Complex File Patterns
Subsections of Advanced Structures
Simple Page
This is a simple Hugo page. It supports all Markdown formatting.
Leaf Page
This is a leaf bundle. It is a folder with a file named index.md without an underscore. Other files under this folder are accessible to the page, but other HTML/Markdown pages will not be rendered in the output.
Branch Bundle
This is a branch bundle. It is a folder with a file named _index.md including the underscore. Other files under this folder are rendered like any other content folder.
Subsections of Branch Bundle
Rendered
This page is included in the output since it is a branch bundle.
Structural Patterns
Patterns we use for various things
Subsections of Structural Patterns
Previous Versions
This is a pattern for managing previous versions of a page. It uses a branch bundle combined with a hidden folder and the children shortcode.
This page would be the current version of the page.
Instead of using LastModifierDisplayName and LastModifierEmail, this site is instead configured to use Hugo Git Info Variables to pull that content from the git repository storing this website.
This template adds one new Frontmatter option:
ordinal: this is used by the new chapter archetype to override the weight as the chapter’s index.
There are many other items that can be added. See Hugo Frontmatter for details. The Hugo Theme Relearn documentation also has an exhaustive list of frontmatter options for the base theme.
Reveal.js Slides
For Reveal.js slides, the frontmatter is as follows:
---
type: "reveal"hidden: true---
These items are used:
type: this tells Hugo to render this page as a Reveal.js page, which will use a different template
hidden: this will remove this item from the menu on the left. This can be added to any page.
Note
Yes, I realize that most pages are using the YAML format for frontmatter (as indicated by the --- surrounding the block as described in the Hugo documentation), but the chapter pages are using TOML (surrounded by +++ instead). I did this simply because the template pages were set that way, but not for any particular reason.
Text
Note
This page is originally a shameful copy of the great Grav original page.
The current version is borrowed from the Hugo Relearn Theme Documentation. Since the CSS on this site is slightly different, below gives a good overview of the formatting as rendered by this theme.
Let’s face it: Writing content for the web is tiresome. WYSIWYG editors help alleviate this task, but they generally result in horrible code, or worse yet, ugly web pages.
Markdown is a better way to write HTML, without all the complexities and ugliness that usually accompanies it.
Some of the key benefits are:
Markdown is simple to learn, with minimal extra characters so it’s also quicker to write content.
Less chance of errors when writing in Markdown.
Produces valid HTML output.
Keeps the content and the visual display separate, so you cannot mess up the look of your site.
Write in any text editor or Markdown application you like.
Markdown is a joy to use!
John Gruber, the author of Markdown, puts it like this:
The overriding design goal for Markdown’s formatting syntax is to make it as readable as possible. The idea is that a Markdown-formatted document should be publishable as-is, as plain text, without looking like it’s been marked up with tags or formatting instructions. While Markdown’s syntax has been influenced by several existing text-to-HTML filters, the single biggest source of inspiration for Markdown’s syntax is the format of plain text email.
John Gruber
Tip
Bookmark this page for easy future reference!
Standard and Extensions
If not otherwise noted, the shown examples adhere to the CommonMark standard. In addition the theme supports the following extensions that can be activated in your hugo.toml or are built into the theme:
HTML If the usage of HTML is allowed, the theme supports styling for further HTML elements.
Relearn Extension specific to this theme.
Paragraphs
In Markdown your content usually spans the whole available document width. This is called a block. Blocks are always separated by whitespace to their adjacent blocks in the resulting document.
Any text not starting with a special sign is written as normal, plain text paragraph block and must be separated to its adjacent blocks by empty lines.
Lorem ipsum dolor sit amet, graecis denique ei vel, at duo primis mandamus.

Et legere ocurreret pri, animal tacimates complectitur ad cum. Cu eum inermis inimicus efficiendi. Labore officiis his ex, soluta officiis concludaturque ei qui, vide sensibus vim ad.
Result
Lorem ipsum dolor sit amet, graecis denique ei vel, at duo primis mandamus.
Et legere ocurreret pri, animal tacimates complectitur ad cum. Cu eum inermis inimicus efficiendi. Labore officiis his ex, soluta officiis concludaturque ei qui, vide sensibus vim ad.
Headings
A good idea is to structure your content using headings and subheadings. HTML-headings from h1 through h6 are constructed with a # for each level.
In Hugo you usually don’t use h1 as this is generated by your theme and you should only have one such element in a document.
To further structure your content you can add horizontal rules. They create a “thematic break” between paragraph blocks. In Markdown, you can create it with three consecutive dashes ---.
Lorem ipsum dolor sit amet, graecis denique ei vel, at duo primis mandamus.

---

Et legere ocurreret pri, animal tacimates complectitur ad cum. Cu eum inermis inimicus efficiendi. Labore officiis his ex, soluta officiis concludaturque ei qui, vide sensibus vim ad.
Result
Lorem ipsum dolor sit amet, graecis denique ei vel, at duo primis mandamus.
Et legere ocurreret pri, animal tacimates complectitur ad cum. Cu eum inermis inimicus efficiendi. Labore officiis his ex, soluta officiis concludaturque ei qui, vide sensibus vim ad.
Blockquotes
Quotations
For quoting blocks of content from another source within your document add > before any text you want to quote.
Blockquotes can also be nested.
> Donec massa lacus, ultricies a ullamcorper in, fermentum sed augue. Nunc augue, aliquam non hendrerit ac, commodo vel nisi.
>
> > Sed adipiscing elit vitae augue consectetur a gravida nunc vehicula. Donec auctor odio non est accumsan facilisis. Aliquam id turpis in dolor tincidunt mollis ac eu diam.
>
> Mauris sit amet ligula egestas, feugiat metus tincidunt, luctus libero. Donec congue finibus tempor. Vestibulum aliquet sollicitudin erat, ut aliquet purus posuere luctus.
Result
Donec massa lacus, ultricies a ullamcorper in, fermentum sed augue. Nunc augue, aliquam non hendrerit ac, commodo vel nisi.
Sed adipiscing elit vitae augue consectetur a gravida nunc vehicula. Donec auctor odio non est accumsan facilisis. Aliquam id turpis in dolor tincidunt mollis ac eu diam.
Mauris sit amet ligula egestas, feugiat metus tincidunt, luctus libero. Donec congue finibus tempor. Vestibulum aliquet sollicitudin erat, ut aliquet purus posuere luctus.
GitHub Alerts
GFM Since Hugo 0.132.0GitHub alerts are also supported. Please note, that coloring and icons of severities may defer between GitHub and this theme.
If you are in need of more advanced options to style your alerts, like icons, use the notice shortcode.
> [!CAUTION]
> Advises about risks or negative outcomes of certain actions.

> [!IMPORTANT]
> Key information users need to know to achieve their goal.

> [!INFO]
> Information that users <ins>_might_</ins> find interesting.

> [!NOTE]
> Useful information that users should know, even when skimming content.

> [!TIP]
> Helpful advice for doing things better or more easily.

> [!WARNING]
> Urgent info that needs immediate user attention to avoid problems.
Result
Caution
Advises about risks or negative outcomes of certain actions.
Important
Key information users need to know to achieve their goal.
Info
Information that users might find interesting.
Note
Useful information that users should know, even when skimming content.
Tip
Helpful advice for doing things better or more easily.
Warning
Urgent info that needs immediate user attention to avoid problems.
Obsidian Callouts
Obsidian Since Hugo 0.134.0Obsidian callouts are also supported. Which enables configurable title text and expand/collapse.
If you are in need of more advanced options to style your alerts, like icons, use the notice shortcode.
> [!tip] Callouts can have custom titles
> Like this one.

> [!tip] Title-only callout

> [!note]- Are callouts foldable?
> Yes! In a foldable callout, the contents are hidden when the callout is collapsed

> [!note]+ Are callouts foldable?
> Yes! In a foldable callout, the contents are hidden when the callout is collapsed
Result
Callouts can have custom titles
Like this one.
Title-only callout
Are callouts foldable?
Yes! In a foldable callout, the contents are hidden when the callout is collapsed
Are callouts foldable?
Yes! In a foldable callout, the contents are hidden when the callout is collapsed
Text Markers
Bold
You can show importance of a snippet of text with a heavier font-weight by enclosing it with two asterisks **.
I am rendered with **bold text**
Result
I am rendered with bold text
Italics
You can emphasize a snippet of text with italics by enclosing it with underscores _.
I am rendered with _italicized text_
Result
I am rendered with italicized text
Marked Text
You can mark text in the predefined accent color of your stylesheet.
HTML You can also use it by configuring Hugo for usage of HTML.
The <ins>hot, new</ins> stuff
Result
The hot, new stuff
Deleted Text
GFM You can do strikethroughs by enclosing text with two tildes ~~. See Hugo’s documentation remarks if you want to use this together with the subscript syntax.
~~Strike through~~ this text
Result
Strike through this text
Special Typesetting
Text Substitution
Pants You can combine multiple punctuation characters to single typographic entities. This will only be applied to text outside of code blocks or inline code.
Double quotes `"` and single quotes `'` of enclosed text are replaced by **"double curly quotes"** and **'single curly quotes'**.

Double dashes `--` and triple dashes `---` are replaced by en-dash **--** and em-dash **---** entities.

Double arrows pointing left `<<` or right `>>` are replaced by arrow **<<** and **>>** entities.

Three consecutive dots `...` are replaced by an ellipsis **...** entity.
Result
Double quotes " and single quotes ' of enclosed text are replaced by “double curly quotes” and ‘single curly quotes’.
Double dashes -- and triple dashes --- are replaced by en-dash – and em-dash — entities.
Double arrows pointing left << or right >> are replaced by arrow « and » entities.
Three consecutive dots ... are replaced by an ellipsis … entity.
Subscript and Superscript
You can also use subscript and superscript text. For more complex stuff, you can use the math shortcode.
HTML You can also use it by configuring Hugo for usage of HTML.
How many liters H<sub>2</sub>O fit into 1dm<sup>3</sup>?
Result
How many liters H2O fit into 1dm3?
Keyboard Shortcuts
HTML You can use the <kbd> element to style keyboard shortcuts.
Press <kbd>STRG</kbd> <kbd>ALT</kbd> <kbd>DEL</kbd> to end your shift early.
Result
Press STRGALTDEL to end your shift early.
Lists
Unordered
You can write a list of items in which the order of the items does not explicitly matter.
It is possible to nest lists by indenting an item for the next sublevel.
You may use any of -, * or + to denote bullets for each list item but should not switch between those symbols inside one whole list.
- Lorem ipsum dolor sit amet
- Consectetur adipiscing elit
  - Vestibulum laoreet porttitor sem
  - Ac tristique libero volutpat at
- Nulla volutpat aliquam velit
  - Phasellus iaculis neque
  - Purus sodales ultricies
- Faucibus porta lacus fringilla vel
Result
Lorem ipsum dolor sit amet
Consectetur adipiscing elit
Vestibulum laoreet porttitor sem
Ac tristique libero volutpat at
Nulla volutpat aliquam velit
Phasellus iaculis neque
Purus sodales ultricies
Faucibus porta lacus fringilla vel
Ordered
You can create a list of items in which the order of items does explicitly matter.
It is possible to nest lists by indenting an item for the next sublevel.
Markdown will automatically number each of your items consecutively. This means, the order number you are providing is irrelevant.
1. Lorem ipsum dolor sit amet
3. Consectetur adipiscing elit
    1. Integer molestie lorem at massa
    7. Facilisis in pretium nisl aliquet
99. Nulla volutpat aliquam velit
    1. Faucibus porta lacus fringilla vel
    1. Aenean sit amet erat nunc
17. Eget porttitor lorem
Result
Lorem ipsum dolor sit amet
Consectetur adipiscing elit
Integer molestie lorem at massa
Facilisis in pretium nisl aliquet
Nulla volutpat aliquam velit
Faucibus porta lacus fringilla vel
Aenean sit amet erat nunc
Eget porttitor lorem
Tasks
GFM You can add task lists resulting in checked or unchecked non-clickable items
- [x] Basic Test
- [ ] More Tests
  - [x] View
  - [x] Hear
  - [ ] Smell
Result
Basic Test
More Tests
View
Hear
Smell
Tree
Relearn You can add lists as a tree with configurable icons and colors.
The name can be followed by an optional pipe (|) to define an icon and further optional pipe to define the icon’s color.
PHP Definition lists are made of terms and definitions of these terms, much like in a dictionary.
A definition list in Markdown Extra is made of a single-line term followed by a colon and the definition for that term. You can also associate more than one term to a definition.
If you add empty lines around the definition terms, additional vertical space will be generated. Also multiple paragraphs are possible
Apple
: Pomaceous fruit of plants of the genus Malus in the family Rosaceae.
: An American computer company.

Orange
: The fruit of an evergreen tree of the genus Citrus.

  You can make juice out of it.
: A telecommunication company.

  You can't make juice out of it.
Result
Apple
Pomaceous fruit of plants of the genus Malus in the family Rosaceae.
An American computer company.
Orange
The fruit of an evergreen tree of the genus Citrus.
You can make juice out of it.
A telecommunication company.
You can’t make juice out of it.
Code
Inline Code
Inline snippets of code can be wrapped with backticks `.
In this example, `<div></div>` is marked as code.
Result
In this example, <div></div> is marked as code.
Indented Code Block
A simple code block can be generated by indenting several lines of code by at least two spaces.
Be impressed by my advanced code:

    // Some comments
    line 1 of code
    line 2 of code
    line 3 of code
Result
Be impressed by my advanced code:
// Some comments
line 1 of code
line 2 of code
line 3 of code
Fenced Code Block
If you want to gain more control of your code block you can enclose your code by at least three backticks ``` a so called fence.
GFM You can also add a language specifier directly after the opening fence, ```js, and syntax highlighting will automatically be applied according to the selected language in the rendered HTML.
GFM You can create tables by adding pipes as dividers between each cell, and by adding a line of dashes (also separated by bars) beneath the header. Note that the pipes do not need to be vertically aligned.
| Option | Description |
|--------|-------------|
| data   | path to data files to supply the data that will be passed into templates. |
| engine | engine to be used for processing templates. Handlebars is the default. |
| ext    | extension to be used for dest files. |
Result
Option
Description
data
path to data files to supply the data that will be passed into templates.
engine
engine to be used for processing templates. Handlebars is the default.
ext
extension to be used for dest files.
Aligned Columns
Adding a colon on the left and/or right side of the dashes below any heading will align the text for that column accordingly.
| Option | Number | Description |
|-------:|:------:|:------------|
| data   | 1      | path to data files to supply the data that will be passed into templates. |
| engine | 2      | engine to be used for processing templates. Handlebars is the default. |
| ext    | 3      | extension to be used for dest files. |
Result
Option
Number
Description
data
1
path to data files to supply the data that will be passed into templates.
engine
2
engine to be used for processing templates. Handlebars is the default.
ext
3
extension to be used for dest files.
Links
Autolink
GFM Absolute URLs will automatically be converted into a link.
Links can be simplyfied for recurring reuse by using a reference ID to later define the URL location. This simplyfies writing if you want to use a link more than once in a document.
[Example][somelinkID]

[somelinkID]: https://example.com "Go to example domain"
PHP Footnotes work mostly like reference-style links. A footnote is made of two things, a marker in the text that will become a superscript number and a footnote definition that will be placed in a list of footnotes.
Usually the list of footnotes will be shown at the end of your document. If we use a footnote in a notice box it will instead be listed at the end of its box.
Footnotes can contain block elements, which means that you can put multiple paragraphs, lists, blockquotes and so on in a footnote. It works the same as for list items, just indent the following paragraphs by four spaces in the footnote definition.
That's some text with a footnote[^1]

[^1]: And that's the footnote.

That's some more text with a footnote.[^someid]

[^someid]:
    Anything of interest goes here.

    Blue light glows blue.
Relearn This theme allows additional non-standard formatting by setting query parameter at the end of the URL. See the link effects docs for a detailed example and how to configure it.
Images can also be linked by reference ID to later define the URL location. This simplyfies writing if you want to use an image more than once in a document.
![La Forge][laforge]

[laforge]: https://octodex.github.com/images/trekkie.jpg "Geordi La Forge"
Result
Image Effects
Relearn This theme allows additional non-standard formatting by setting query parameter at the end of the image URL. See the image effects docs for a detailed example and how to configure it.
Resizing
Add query parameter width and/or height to the link image to resize the image. Values are CSS values (default is auto).
If you want to wrap an image in a link and lightbox=true is your default setting, you have to explicitly disable the lightbox to avoid it to hijacking your link like:
The notice shortcode has been modified to make the following changes:
The colors for the note and info styles have been swapped to match the earlier template
A special noiframe type has been added, see below.
No Iframe
{{% notice noiframe %}}
A disclaimer that will not be visible on the embedded version of the page
{{% /notice %}}
renders as
Web Only
A disclaimer that will not be visible on the embedded version of the page
TODO FIXME embed output format below
That item will not render on the embed version of this page.
Encrypt
A shortcode was created to enable the encryption and decryption of pages. This allows secured content to be posted on the web, with the password shared elsewhere, such as in an LMS. A person with the password can use it to decrypt the page and see the content.
Of course, care must be taken not to commit the secured content in its raw form to a public Git repository. To aid in editing, we recommend including a version of the original content in the encrypted content.
Lorem ipsum dolor sit amet, consectetur adipiscing elit. Vivamus sit amet placerat risus. In hac habitasse platea dictumst. Etiam risus massa, finibus vitae felis non, hendrerit auctor nibh. Morbi ut odio posuere, pharetra metus vitae, venenatis turpis. Nullam interdum imperdiet orci, ut ultrices magna. Donec a odio eu tellus commodo venenatis a nec dolor. Nam dictum auctor enim ut consequat. Phasellus sit amet sapien ipsum. Aenean scelerisque mi orci, ut aliquam eros volutpat id. Proin interdum convallis nunc, vel mollis leo pellentesque interdum.
Donec mollis egestas lacus vitae suscipit. Vestibulum in varius massa. Nam quis velit ut dolor pellentesque molestie vel non massa. Morbi hendrerit consequat mollis. Cras ligula massa, mollis eu urna non, eleifend scelerisque nulla. Mauris vel magna aliquam arcu lobortis sollicitudin in aliquam tortor. Curabitur nec sapien felis. Etiam quis mattis mi. Phasellus leo tortor, rhoncus at viverra at, porta viverra turpis. Ut elementum tortor sit amet ex volutpat pellentesque. Integer posuere enim tortor, eget finibus dolor sodales eleifend. Phasellus at rutrum sapien, in faucibus enim. Praesent vel convallis orci.
Bold
Italics
some code
a longer code block
Source File (for Editing)
### Example File to be Encrypted

**Password:** testpassword

### Sample Text

Lorem ipsum dolor sit amet, consectetur adipiscing elit. Vivamus sit amet placerat risus. In hac habitasse platea dictumst. Etiam risus massa, finibus vitae felis non, hendrerit auctor nibh. Morbi ut odio posuere, pharetra metus vitae, venenatis turpis. Nullam interdum imperdiet orci, ut ultrices magna. Donec a odio eu tellus commodo venenatis a nec dolor. Nam dictum auctor enim ut consequat. Phasellus sit amet sapien ipsum. Aenean scelerisque mi orci, ut aliquam eros volutpat id. Proin interdum convallis nunc, vel mollis leo pellentesque interdum.

Donec mollis egestas lacus vitae suscipit. Vestibulum in varius massa. Nam quis velit ut dolor pellentesque molestie vel non massa. Morbi hendrerit consequat mollis. Cras ligula massa, mollis eu urna non, eleifend scelerisque nulla. Mauris vel magna aliquam arcu lobortis sollicitudin in aliquam tortor. Curabitur nec sapien felis. Etiam quis mattis mi. Phasellus leo tortor, rhoncus at viverra at, porta viverra turpis. Ut elementum tortor sit amet ex volutpat pellentesque. Integer posuere enim tortor, eget finibus dolor sodales eleifend. Phasellus at rutrum sapien, in faucibus enim. Praesent vel convallis orci.

**Bold**

_Italics_

`some code`

```
a longer code block
```
A shortcode was created to enable the inclusion of other markdown files. This allows us to create modular websites that reuse pieces of content, such as standardized syllabus statements.
There are two forms of the include shortcode - one to include files relative to the project root, and one to include files relative to the current file.
Note
This should also now work with shortcodes! See this GitHub Issue for more information. The .markdownify function was substituted for safeHTML in the include shortcode.
Include Local
This will include a file relative to the current page’s file path.
{{< include-local "includes/01-include.md" >}}
renders as
Content from a local file
This content is included from a local file. It can include any valid markdown. This file is inside of a folder with an _index.md file with the hidden: true attribute set, so it isn’t included in the menu.
Note
Shortcodes are now working! See this issue on GitHub for details.
Include
This will include a file with the filepath relative to the project root. This takes advantage of Hugo’s Union File System so that directories from the theme module are also accessible at paths relative to the project root.
{{< include "data/syllabus/netiquette.md" >}}
renders as
Netiquette
Info
This is our personal policy and not a required syllabus statement from K-State. It has been adapted from this statement from K-State Online, and theRecurse Center Manual. We have adapted their ideas to fit this course.
Online communication is inherently different than in-person communication. When speaking in person, many times we can take advantage of the context and body language of the person speaking to better understand what the speaker means, not just what is said. This information is not present when communicating online, so we must be much more careful about what we say and how we say it in order to get our meaning across.
Here are a few general rules to help us all communicate online in this course, especially while using tools such as Canvas or Discord:
Use a clear and meaningful subject line to announce your topic. Subject lines such as “Question” or “Problem” are not helpful. Subjects such as “Logic Question in Project 5, Part 1 in Java” or “Unexpected Exception when Opening Text File in Python” give plenty of information about your topic.
Use only one topic per message. If you have multiple topics, post multiple messages so each one can be discussed independently.
Be thorough, concise, and to the point. Ideally, each message should be a page or less.
Include exact error messages, code snippets, or screenshots, as well as any previous steps taken to fix the problem. It is much easier to solve a problem when the exact error message or screenshot is provided. If we know what you’ve tried so far, we can get to the root cause of the issue more quickly.
Consider carefully what you write before you post it. Once a message is posted, it becomes part of the permanent record of the course and can easily be found by others.
If you are lost, don’t know an answer, or don’t understand something, speak up! Email and Canvas both allow you to send a message privately to the instructors, so other students won’t see that you asked a question. Don’t be afraid to ask questions anytime, as you can choose to do so without any fear of being identified by your fellow students.
Class discussions are confidential. Do not share information from the course with anyone outside of the course without explicit permission.
Do not quote entire message chains; only include the relevant parts. When replying to a previous message, only quote the relevant lines in your response.
Do not use all caps. It makes it look like you are shouting. Use appropriate text markup (bold, italics, etc.) to highlight a point if needed.
No feigning surprise. If someone asks a question, saying things like “I can’t believe you don’t know that!” are not helpful, and only serve to make that person feel bad.
No “well-actually’s.” If someone makes a statement that is not entirely correct, resist the urge to offer a “well, actually…” correction, especially if it is not relevant to the discussion. If you can help solve their problem, feel free to provide correct information, but don’t post a correction just for the sake of being correct.
Do not correct someone’s grammar or spelling. Again, it is not helpful, and only serves to make that person feel bad. If there is a genuine mistake that may affect the meaning of the post, please contact the person privately or let the instructors know privately so it can be resolved.
Avoid subtle -isms and microaggressions. Avoid comments that could make others feel uncomfortable based on their personal identity. See the syllabus section on Diversity and Inclusion above for more information on this topic. If a comment makes you uncomfortable, please contact the instructor.
Avoid sarcasm, flaming, advertisements, lingo, trolling, doxxing, and other bad online habits. They have no place in an academic environment. Tasteful humor is fine, but sarcasm can be misunderstood.
As a participant in course discussions, you should also strive to honor the diversity of your classmates by adhering to the K-State Principles of Community.
Links
The link shortcode from the previous template has been deprecated. Instead, this template will now render links in two ways:
If the link href contains http, then it assumes it is an external link and will open in a new tab.
Otherwise, the link will be assumed to be local and will open in the same tab.
See the externalLinkTarget configuration item. Documentation
No Render
The norender shortcode has been deprecated. It can be safely replaced with <pre> in Markdown without any issue.
Static
The static shortcode has been deprecated. All static content should be stored in the assets folder outside of content, and with the canonifyURLs option set to true in the site config, they can be referenced directly at the root of the site.
For example, the file at /static/images/core-logo-on-white.svg can be referenced using:
---
primaryColor: '#512888'
secondaryColor: '#cccccc'
textColor: black
shuffleQuestions: true
shuffleAnswers: true
locale: en
---
# Python Lists
What is the value of `x[2]`?
> Python lists are mutable!
```python
x = [2, 3, 4]
x[2] = 4
print(x[2])
```
- [ ] 1
- [ ] 2
- [ ] 3
- [x] 4
# What is the capital of Germany?

> It's the largest city in Germany!
1. [ ] Frankfurt
1. [x] Berlin
1. [ ] Hamburg
1. [ ] Munich
Syllabus
The syllabus shortcode can be used to include the default K-State syllabus statements that are embedded into the theme. The theme maintainer will update these statements each semester, so by using this shortcode and keeping your theme updated, your textbooks will always have the current statements.
The syllabus statements can be found in /themes/hugo-theme-learn/static/files/syllabus/. The text of nearly all of these statements can be found on the Provost’s Website.
Default Usage
{{< syllabus >}}
This will include all of the default syllabus statements on the page. Currently, the default syllabus statements are included in this order:
honesty
disabilities
conduct
respect
netiquette (this is a custom statement for K-State CS courses)
discrimination
freedom
safety
resources
creations
mentalhealth
absences
copyright
Available Statements
In addition to the default statements, the following optional statements are available:
safezone
facecoverings (deprecated as of Fall 2023)
weapons
Customizing
There are two ways to customize the syllabus statements:
The include parameter is a space-delimited list of statements to include. They will be included in the order listed.
Exclude
{{< syllabus exclude="copyright honesty" >}}
The exclude parameter is a space-delimited list of statements to be excluded from the default list.
Subsections of Syllabus
Example - All
This example page shows all current default syllabus statements.
Standard Syllabus Statements
Info
The statements below are standard syllabus statements from K-State and our program. The latest versions are available online here.
Academic Honesty
Kansas State University has an Honor and Integrity System based on personal integrity, which is presumed to be sufficient assurance that, in academic matters, one’s work is performed honestly and without unauthorized assistance. Undergraduate and graduate students, by registration, acknowledge the jurisdiction of the Honor and Integrity System. The policies and procedures of the Honor and Integrity System apply to all full and part-time students enrolled in undergraduate and graduate courses on-campus, off-campus, and via distance learning. A component vital to the Honor and Integrity System is the inclusion of the Honor Pledge which applies to all assignments, examinations, or other course work undertaken by students. The Honor Pledge is implied, whether or not it is stated: “On my honor, as a student, I have neither given nor received unauthorized aid on this academic work.” A grade of XF can result from a breach of academic honesty. The F indicates failure in the course; the X indicates the reason is an Honor Pledge violation.
For this course, a violation of the Honor Pledge will result in sanctions such as a 0 on the assignment or an XF in the course, depending on severity. Actively seeking unauthorized aid, such as posting lab assignments on sites such as Chegg or StackOverflow, or asking another person to complete your work, even if unsuccessful, will result in an immediate XF in the course.
This course assumes that all your course work will be done by you. Use of AI text and code generators such as ChatGPT and GitHub Copilot in any submission for this course is strictly forbidden unless explicitly allowed by your instructor. Any unauthorized use of these tools without proper attribution is a violation of the K-State Honor Pledge.
We reserve the right to use various platforms that can perform automatic plagiarism detection by tracking changes made to files and comparing submitted projects against other students’ submissions and known solutions. That information may be used to determine if plagiarism has taken place.
Students with Disabilities
At K-State it is important that every student has access to course content and the means to demonstrate course mastery. Students with disabilities may benefit from services including accommodations provided by the Student Access Center. Disabilities can include physical, learning, executive functions, and mental health. You may register at the Student Access Center or to learn more contact:
Manhattan/Olathe/Global Campus – Student Access Center
Students already registered with the Student Access Center please request your Letters of Accommodation early in the semester to provide adequate time to arrange your approved academic accommodations. Once SAC approves your Letter of Accommodation it will be e-mailed to you, and your instructor(s) for this course. Please follow up with your instructor to discuss how best to implement the approved accommodations.
Expectations for Conduct
All student activities in the University, including this course, are governed by the Student Judicial Conduct Code as outlined in the Student Governing Association By Laws, Article V, Section 3, number 2. Students who engage in behavior that disrupts the learning environment may be asked to leave the class.
Mutual Respect and Inclusion in K-State Teaching & Learning Spaces
At K-State, faculty and staff are committed to creating and maintaining an inclusive and supportive learning environment for students from diverse backgrounds and perspectives. K-State courses, labs, and other virtual and physical learning spaces promote equitable opportunity to learn, participate, contribute, and succeed, regardless of age, race, color, ethnicity, nationality, genetic information, ancestry, disability, socioeconomic status, military or veteran status, immigration status, Indigenous identity, gender identity, gender expression, sexuality, religion, culture, as well as other social identities.
Faculty and staff are committed to promoting equity and believe the success of an inclusive learning environment relies on the participation, support, and understanding of all students. Students are encouraged to share their views and lived experiences as they relate to the course or their course experience, while recognizing they are doing so in a learning environment in which all are expected to engage with respect to honor the rights, safety, and dignity of others in keeping with the K-State Principles of Community.
This is our personal policy and not a required syllabus statement from K-State. It has been adapted from this statement from K-State Online, and theRecurse Center Manual. We have adapted their ideas to fit this course.
Online communication is inherently different than in-person communication. When speaking in person, many times we can take advantage of the context and body language of the person speaking to better understand what the speaker means, not just what is said. This information is not present when communicating online, so we must be much more careful about what we say and how we say it in order to get our meaning across.
Here are a few general rules to help us all communicate online in this course, especially while using tools such as Canvas or Discord:
Use a clear and meaningful subject line to announce your topic. Subject lines such as “Question” or “Problem” are not helpful. Subjects such as “Logic Question in Project 5, Part 1 in Java” or “Unexpected Exception when Opening Text File in Python” give plenty of information about your topic.
Use only one topic per message. If you have multiple topics, post multiple messages so each one can be discussed independently.
Be thorough, concise, and to the point. Ideally, each message should be a page or less.
Include exact error messages, code snippets, or screenshots, as well as any previous steps taken to fix the problem. It is much easier to solve a problem when the exact error message or screenshot is provided. If we know what you’ve tried so far, we can get to the root cause of the issue more quickly.
Consider carefully what you write before you post it. Once a message is posted, it becomes part of the permanent record of the course and can easily be found by others.
If you are lost, don’t know an answer, or don’t understand something, speak up! Email and Canvas both allow you to send a message privately to the instructors, so other students won’t see that you asked a question. Don’t be afraid to ask questions anytime, as you can choose to do so without any fear of being identified by your fellow students.
Class discussions are confidential. Do not share information from the course with anyone outside of the course without explicit permission.
Do not quote entire message chains; only include the relevant parts. When replying to a previous message, only quote the relevant lines in your response.
Do not use all caps. It makes it look like you are shouting. Use appropriate text markup (bold, italics, etc.) to highlight a point if needed.
No feigning surprise. If someone asks a question, saying things like “I can’t believe you don’t know that!” are not helpful, and only serve to make that person feel bad.
No “well-actually’s.” If someone makes a statement that is not entirely correct, resist the urge to offer a “well, actually…” correction, especially if it is not relevant to the discussion. If you can help solve their problem, feel free to provide correct information, but don’t post a correction just for the sake of being correct.
Do not correct someone’s grammar or spelling. Again, it is not helpful, and only serves to make that person feel bad. If there is a genuine mistake that may affect the meaning of the post, please contact the person privately or let the instructors know privately so it can be resolved.
Avoid subtle -isms and microaggressions. Avoid comments that could make others feel uncomfortable based on their personal identity. See the syllabus section on Diversity and Inclusion above for more information on this topic. If a comment makes you uncomfortable, please contact the instructor.
Avoid sarcasm, flaming, advertisements, lingo, trolling, doxxing, and other bad online habits. They have no place in an academic environment. Tasteful humor is fine, but sarcasm can be misunderstood.
As a participant in course discussions, you should also strive to honor the diversity of your classmates by adhering to the K-State Principles of Community.
Discrimination, Harassment, and Sexual Harassment
Kansas State University is committed to maintaining academic, housing, and work environments that are free of discrimination, harassment, and sexual harassment. Instructors support the University’s commitment by creating a safe learning environment during this course, free of conduct that would interfere with your academic opportunities. Instructors also have a duty to report any behavior they become aware of that potentially violates the University’s policy prohibiting discrimination, harassment, and sexual harassment, as outlined by PPM 3010.
Kansas State University is a community of students, faculty, and staff who work together to discover new knowledge, create new ideas, and share the results of their scholarly inquiry with the wider public. Although new ideas or research results may be controversial or challenge established views, the health and growth of any society requires frank intellectual exchange. Academic freedom protects this type of free exchange and is thus essential to any university’s mission.
Moreover, academic freedom supports collaborative work in the pursuit of truth and the dissemination of knowledge in an environment of inquiry, respectful debate, and professionalism. Academic freedom is not limited to the classroom or to scientific and scholarly research, but extends to the life of the university as well as to larger social and political questions. It is the right and responsibility of the university community to engage with such issues.
Campus Safety
Kansas State University is committed to providing a safe teaching and learning environment for student and faculty members. In order to enhance your safety in the unlikely case of a campus emergency make sure that you know where and how to quickly exit your classroom and how to follow any emergency directives. Current Campus Emergency Information is available at the University’s Advisory webpage.
Student Resources
K-State has many resources to help contribute to student success. These resources include accommodations for academics, paying for college, student life, health and safety, and others. Check out the Student Guide to Help and Resources: One Stop Shop for more information.
Your mental health and good relationships are vital to your overall well-being. Symptoms of mental health issues may include excessive sadness or worry, thoughts of death or self-harm, inability to concentrate, lack of motivation, or substance abuse. Although problems can occur anytime for anyone, you should pay extra attention to your mental health if you are feeling academic or financial stress, discrimination, or have experienced a traumatic event, such as loss of a friend or family member, sexual assault or other physical or emotional abuse.
If you are struggling with these issues, do not wait to seek assistance.
K-State has a University Excused Absence policy (Section F62). Class absence(s) will be handled between the instructor and the student unless there are other university offices involved. For university excused absences, instructors shall provide the student the opportunity to make up missed assignments, activities, and/or attendance specific points that contribute to the course grade, unless they decide to excuse those missed assignments from the student’s course grade. Please see the policy for a complete list of university excused absences and how to obtain one. Students are encouraged to contact their instructor regarding their absences.
This example page shows all current default syllabus statements, except for the statement on academic honesty and copyright. This allows instructors to modify those sections in the syllabus as desired.
Standard Syllabus Statements
Info
The statements below are standard syllabus statements from K-State and our program. The latest versions are available online here.
Students with Disabilities
At K-State it is important that every student has access to course content and the means to demonstrate course mastery. Students with disabilities may benefit from services including accommodations provided by the Student Access Center. Disabilities can include physical, learning, executive functions, and mental health. You may register at the Student Access Center or to learn more contact:
Manhattan/Olathe/Global Campus – Student Access Center
Students already registered with the Student Access Center please request your Letters of Accommodation early in the semester to provide adequate time to arrange your approved academic accommodations. Once SAC approves your Letter of Accommodation it will be e-mailed to you, and your instructor(s) for this course. Please follow up with your instructor to discuss how best to implement the approved accommodations.
Expectations for Conduct
All student activities in the University, including this course, are governed by the Student Judicial Conduct Code as outlined in the Student Governing Association By Laws, Article V, Section 3, number 2. Students who engage in behavior that disrupts the learning environment may be asked to leave the class.
Mutual Respect and Inclusion in K-State Teaching & Learning Spaces
At K-State, faculty and staff are committed to creating and maintaining an inclusive and supportive learning environment for students from diverse backgrounds and perspectives. K-State courses, labs, and other virtual and physical learning spaces promote equitable opportunity to learn, participate, contribute, and succeed, regardless of age, race, color, ethnicity, nationality, genetic information, ancestry, disability, socioeconomic status, military or veteran status, immigration status, Indigenous identity, gender identity, gender expression, sexuality, religion, culture, as well as other social identities.
Faculty and staff are committed to promoting equity and believe the success of an inclusive learning environment relies on the participation, support, and understanding of all students. Students are encouraged to share their views and lived experiences as they relate to the course or their course experience, while recognizing they are doing so in a learning environment in which all are expected to engage with respect to honor the rights, safety, and dignity of others in keeping with the K-State Principles of Community.
This is our personal policy and not a required syllabus statement from K-State. It has been adapted from this statement from K-State Online, and theRecurse Center Manual. We have adapted their ideas to fit this course.
Online communication is inherently different than in-person communication. When speaking in person, many times we can take advantage of the context and body language of the person speaking to better understand what the speaker means, not just what is said. This information is not present when communicating online, so we must be much more careful about what we say and how we say it in order to get our meaning across.
Here are a few general rules to help us all communicate online in this course, especially while using tools such as Canvas or Discord:
Use a clear and meaningful subject line to announce your topic. Subject lines such as “Question” or “Problem” are not helpful. Subjects such as “Logic Question in Project 5, Part 1 in Java” or “Unexpected Exception when Opening Text File in Python” give plenty of information about your topic.
Use only one topic per message. If you have multiple topics, post multiple messages so each one can be discussed independently.
Be thorough, concise, and to the point. Ideally, each message should be a page or less.
Include exact error messages, code snippets, or screenshots, as well as any previous steps taken to fix the problem. It is much easier to solve a problem when the exact error message or screenshot is provided. If we know what you’ve tried so far, we can get to the root cause of the issue more quickly.
Consider carefully what you write before you post it. Once a message is posted, it becomes part of the permanent record of the course and can easily be found by others.
If you are lost, don’t know an answer, or don’t understand something, speak up! Email and Canvas both allow you to send a message privately to the instructors, so other students won’t see that you asked a question. Don’t be afraid to ask questions anytime, as you can choose to do so without any fear of being identified by your fellow students.
Class discussions are confidential. Do not share information from the course with anyone outside of the course without explicit permission.
Do not quote entire message chains; only include the relevant parts. When replying to a previous message, only quote the relevant lines in your response.
Do not use all caps. It makes it look like you are shouting. Use appropriate text markup (bold, italics, etc.) to highlight a point if needed.
No feigning surprise. If someone asks a question, saying things like “I can’t believe you don’t know that!” are not helpful, and only serve to make that person feel bad.
No “well-actually’s.” If someone makes a statement that is not entirely correct, resist the urge to offer a “well, actually…” correction, especially if it is not relevant to the discussion. If you can help solve their problem, feel free to provide correct information, but don’t post a correction just for the sake of being correct.
Do not correct someone’s grammar or spelling. Again, it is not helpful, and only serves to make that person feel bad. If there is a genuine mistake that may affect the meaning of the post, please contact the person privately or let the instructors know privately so it can be resolved.
Avoid subtle -isms and microaggressions. Avoid comments that could make others feel uncomfortable based on their personal identity. See the syllabus section on Diversity and Inclusion above for more information on this topic. If a comment makes you uncomfortable, please contact the instructor.
Avoid sarcasm, flaming, advertisements, lingo, trolling, doxxing, and other bad online habits. They have no place in an academic environment. Tasteful humor is fine, but sarcasm can be misunderstood.
As a participant in course discussions, you should also strive to honor the diversity of your classmates by adhering to the K-State Principles of Community.
Discrimination, Harassment, and Sexual Harassment
Kansas State University is committed to maintaining academic, housing, and work environments that are free of discrimination, harassment, and sexual harassment. Instructors support the University’s commitment by creating a safe learning environment during this course, free of conduct that would interfere with your academic opportunities. Instructors also have a duty to report any behavior they become aware of that potentially violates the University’s policy prohibiting discrimination, harassment, and sexual harassment, as outlined by PPM 3010.
Kansas State University is a community of students, faculty, and staff who work together to discover new knowledge, create new ideas, and share the results of their scholarly inquiry with the wider public. Although new ideas or research results may be controversial or challenge established views, the health and growth of any society requires frank intellectual exchange. Academic freedom protects this type of free exchange and is thus essential to any university’s mission.
Moreover, academic freedom supports collaborative work in the pursuit of truth and the dissemination of knowledge in an environment of inquiry, respectful debate, and professionalism. Academic freedom is not limited to the classroom or to scientific and scholarly research, but extends to the life of the university as well as to larger social and political questions. It is the right and responsibility of the university community to engage with such issues.
Campus Safety
Kansas State University is committed to providing a safe teaching and learning environment for student and faculty members. In order to enhance your safety in the unlikely case of a campus emergency make sure that you know where and how to quickly exit your classroom and how to follow any emergency directives. Current Campus Emergency Information is available at the University’s Advisory webpage.
Student Resources
K-State has many resources to help contribute to student success. These resources include accommodations for academics, paying for college, student life, health and safety, and others. Check out the Student Guide to Help and Resources: One Stop Shop for more information.
Your mental health and good relationships are vital to your overall well-being. Symptoms of mental health issues may include excessive sadness or worry, thoughts of death or self-harm, inability to concentrate, lack of motivation, or substance abuse. Although problems can occur anytime for anyone, you should pay extra attention to your mental health if you are feeling academic or financial stress, discrimination, or have experienced a traumatic event, such as loss of a friend or family member, sexual assault or other physical or emotional abuse.
If you are struggling with these issues, do not wait to seek assistance.
K-State has a University Excused Absence policy (Section F62). Class absence(s) will be handled between the instructor and the student unless there are other university offices involved. For university excused absences, instructors shall provide the student the opportunity to make up missed assignments, activities, and/or attendance specific points that contribute to the course grade, unless they decide to excuse those missed assignments from the student’s course grade. Please see the policy for a complete list of university excused absences and how to obtain one. Students are encouraged to contact their instructor regarding their absences.
Example - Include
This example page shows only a few selected syllabus statements. This allows instructors to control the order they are presented or only show selected items.
Standard Syllabus Statements
Info
The statements below are standard syllabus statements from K-State and our program. The latest versions are available online here.
Academic Honesty
Kansas State University has an Honor and Integrity System based on personal integrity, which is presumed to be sufficient assurance that, in academic matters, one’s work is performed honestly and without unauthorized assistance. Undergraduate and graduate students, by registration, acknowledge the jurisdiction of the Honor and Integrity System. The policies and procedures of the Honor and Integrity System apply to all full and part-time students enrolled in undergraduate and graduate courses on-campus, off-campus, and via distance learning. A component vital to the Honor and Integrity System is the inclusion of the Honor Pledge which applies to all assignments, examinations, or other course work undertaken by students. The Honor Pledge is implied, whether or not it is stated: “On my honor, as a student, I have neither given nor received unauthorized aid on this academic work.” A grade of XF can result from a breach of academic honesty. The F indicates failure in the course; the X indicates the reason is an Honor Pledge violation.
For this course, a violation of the Honor Pledge will result in sanctions such as a 0 on the assignment or an XF in the course, depending on severity. Actively seeking unauthorized aid, such as posting lab assignments on sites such as Chegg or StackOverflow, or asking another person to complete your work, even if unsuccessful, will result in an immediate XF in the course.
This course assumes that all your course work will be done by you. Use of AI text and code generators such as ChatGPT and GitHub Copilot in any submission for this course is strictly forbidden unless explicitly allowed by your instructor. Any unauthorized use of these tools without proper attribution is a violation of the K-State Honor Pledge.
We reserve the right to use various platforms that can perform automatic plagiarism detection by tracking changes made to files and comparing submitted projects against other students’ submissions and known solutions. That information may be used to determine if plagiarism has taken place.
Students with Disabilities
At K-State it is important that every student has access to course content and the means to demonstrate course mastery. Students with disabilities may benefit from services including accommodations provided by the Student Access Center. Disabilities can include physical, learning, executive functions, and mental health. You may register at the Student Access Center or to learn more contact:
Manhattan/Olathe/Global Campus – Student Access Center
Students already registered with the Student Access Center please request your Letters of Accommodation early in the semester to provide adequate time to arrange your approved academic accommodations. Once SAC approves your Letter of Accommodation it will be e-mailed to you, and your instructor(s) for this course. Please follow up with your instructor to discuss how best to implement the approved accommodations.
Expectations for Conduct
All student activities in the University, including this course, are governed by the Student Judicial Conduct Code as outlined in the Student Governing Association By Laws, Article V, Section 3, number 2. Students who engage in behavior that disrupts the learning environment may be asked to leave the class.
Mutual Respect and Inclusion in K-State Teaching & Learning Spaces
At K-State, faculty and staff are committed to creating and maintaining an inclusive and supportive learning environment for students from diverse backgrounds and perspectives. K-State courses, labs, and other virtual and physical learning spaces promote equitable opportunity to learn, participate, contribute, and succeed, regardless of age, race, color, ethnicity, nationality, genetic information, ancestry, disability, socioeconomic status, military or veteran status, immigration status, Indigenous identity, gender identity, gender expression, sexuality, religion, culture, as well as other social identities.
Faculty and staff are committed to promoting equity and believe the success of an inclusive learning environment relies on the participation, support, and understanding of all students. Students are encouraged to share their views and lived experiences as they relate to the course or their course experience, while recognizing they are doing so in a learning environment in which all are expected to engage with respect to honor the rights, safety, and dignity of others in keeping with the K-State Principles of Community.
Kansas State University strongly encourages, but does not require, that everyone wear masks while indoors on university property, including while attending in-person classes. For additional information and the latest updates, see K-State’s face covering policy.
Discrimination, Harassment, and Sexual Harassment
Kansas State University is committed to maintaining academic, housing, and work environments that are free of discrimination, harassment, and sexual harassment. Instructors support the University’s commitment by creating a safe learning environment during this course, free of conduct that would interfere with your academic opportunities. Instructors also have a duty to report any behavior they become aware of that potentially violates the University’s policy prohibiting discrimination, harassment, and sexual harassment, as outlined by PPM 3010.
Hugo uses Markdown as its content format. However, there are a lot of things that Markdown doesn’t support well.
You could use pure HTML to expand your possibilities. But this happens to be a bad idea. Everyone uses Markdown because it’s pure and simple to read. You should avoid HTML to keep it as simple and portable as possible.
To avoid Markdown’s limitations, Hugo created shortcodes. A shortcode is a simple snippet inside of a page.
Lorem ipsum dolor sit amet, graecis denique ei vel, at duo primis mandamus. Awesome Et legere ocurreret pri, animal tacimates complectitur ad cum. Cu eum inermis inimicus efficiendi. Labore officiis his ex, soluta officiis concludaturque ei qui, vide sensibus vim ad.
Button
The button shortcode displays a clickable button with adjustable color, title and icon.
Either the destination URL for the button or JavaScript code to be executed on click. If this parameter is not set, the button will do nothing but is still displayed as clickable.
- if starting with javascript: all following text will be executed in your browser - every other string will be interpreted as URL, you can use link effects as well
style
transparent
The style scheme used for the button.
- by severity: caution, important, info, note, tip, warning - by brand color: primary, secondary, accent - by color: blue, cyan, green, grey, magenta, orange, red - by special color: default, transparent, code
Choose the style used to group all children. It could be any HTML tag name.
style
li
Choose the style used to display each descendant. It could be any HTML tag name.
showhidden
false
When true, child pages hidden from the menu will be displayed as well.
description
false
When true shows a short text under each page in the list. When no description or summary exists for the page, the first 70 words of the content is taken - read more info about summaries on gohugo.io.
depth
1
The depth of descendants to display. For example, if the value is 2, the shortcode will display two levels of child pages. To get all descendants, set this value to a high number eg. 999.
sort
auto
The sort criteria of the displayed list.
- auto defaults to ordersectionsby of the page’s Front Matter or to ordersectionsby of the configuration Option or to default - weight - title - modifieddate - expirydate - publishdate - date - length - default adhering to Hugo’s default sort criteria
Extended callout syntax is available in other Markdown parsers like Obsidian and therefore is the recommend syntax for generating portable Markdown.
The notice shortcode is also capable of displaying expandable/collapsible sections of text but with additional parameter for color and additional icons.
The theme supports Hugo’s built-in details shortcode by mapping the parameter to the theme’s expand shortcode.
Parameter
Name
Position
Default
Notes
title
1
"Expand me..."
Arbitrary text to appear next to the expand/collapse icon.
expanded
2
false
How the content is displayed.
- true: the content is initially shown - false: the content is initially hidden
This shortcode is fully compatible with Hugo’s highlight shortcode but offers some extensions.
It is called interchangeably in the same way as Hugo’s own shortcode by providing positional parameter or simply by using Markdown codefences.
You are free to also call this shortcode from your own partials. In this case it resembles Hugo’s highlight function syntax if you call it using compatibility syntax.
Codefence syntax is widely available in other Markdown parsers like GitHub and therefore is the recommend syntax for generating portable Markdown.
The tab shortcode is also capable of displaying code but with limited options.
Parameter
Name
Position
Default
Notes
type
1
<empty>
The language of the code to highlight. Choose from one of the supported languages. Case-insensitive.
title
<empty>
Extension. Arbitrary title for code. This displays the code like a single tab if hl_inline=false (which is Hugo’s default).
wrap
see notes
Extension. When true the content may wrap on long lines otherwise it will be scrollable.
The default value can be set in your hugo.toml and overwritten via front matter. See below.
options
2
<empty>
An optional, comma-separated list of zero or more Hugo supported options as well as extension parameter from this table.
You can configure the color style used for code blocks in your color variants stylesheet file using the --CODE-theme variable. This requires further configuration as described in the above link.
Examples
Line Numbers with Starting Offset
As mentioned above, line numbers in a table layout will shift if code is wrapping, so better use inline. To make things easier for you, set lineNumbersInTable = false in your hugo.toml and add lineNos = true when calling the shortcode instead of the specific values table or inline.
# the hardest part is to start writing code; here's a kickstart; just copy and paste this; it's free; the next lines will cost you serious creditsprint("Hello")
print(" ")
print("World")
print("!")
Markdown Codefence with Title
```py { title="python" }
# a bit shorter
print("Hello World!")
```
# Quicksort Python One-linerlambda L: [] if L==[] else qsort([x for x in L[1:] if x< L[0]]) + L[0:1] + qsort([x for x in L[1:] if x>=L[0]])
# Some more stuff
# Quicksort Python One-linerlambda L: [] if L==[] else qsort([x for x in L[1:] if x< L[0]]) + L[0:1] + qsort([x for x in L[1:] if x>=L[0]])
# Some more stuff
Icon
The icon shortcode displays icons using the Font Awesome library.
The CSS color value to be used. If not set, the chosen color depends on the style. Any given value will overwrite the default.
- for severity styles: a nice matching color for the severity - for all other styles: the corresponding color
Finding an icon
Browse through the available icons in the Font Awesome Gallery. Notice that the free filter is enabled, as only the free icons are available by default.
Once on the Font Awesome page for a specific icon, for example the page for the heart, copy the icon name and paste into the Markdown content.
Customizing Icons
Font Awesome provides many ways to modify the icon
Change color (by default the icon will inherit the parent color)
Built with by Relearn and Hugo - long form, same as above
Built with by Relearn and Hugo - this uses the HTML color red instead of the red style
Advanced HTML Usage
While the shortcode simplifies using standard icons, the icon customization and other advanced features of the Font Awesome library require you to use HTML directly. Paste the <i> HTML into markup, and Font Awesome will load the relevant icon.
Built with <iclass="fas fa-heart"></i> by Relearn and Hugo
Built with by Relearn and Hugo
To use these native HTML elements in your Markdown, add this in your hugo.toml:
[markup.goldmark.renderer]
    unsafe = true
Include
The include shortcode includes other pages, resources or files from your project.
When true and the included file contains headings, the first heading will be hidden. This comes in handy, eg. if you include otherwise standalone Markdown files.
Settings
Enabling Link Warnings
OptionFront Matter You can use include.errorlevel to control what should happen if a local link can not be resolved to a resource.
If not set or empty, any unresolved link is written as given into the resulting output. If set to warning the same happens and an additional warning is printed in the built console. If set to error an error message is printed and the build is aborted.
Please note that this can not resolve files inside of your static directory. The file must be a resource of the page or the site.
the possibilities are endless (almost - including other shortcodes may or may not work) (almost - including other shortcodes may or may not work)
Et Cetera (English: /ɛtˈsɛtərə/), abbreviated to etc., etc, et cet., is a Latin expression that is used in English to mean “and other similar things”, or “and so forth” ↩︎
Math
If this is not enough, the math shortcode helps you rendering math and chemical formulae using the MathJax library.
You can also use pure Markdown for writing simple math expressions.
Passthrough syntax is only available by further configuration and has limited features as it does not provide any of the below parameter. Nevertheless, it is widely available in other Markdown parsers like GitHub and therefore is the recommend syntax for generating portable Markdown.
Parameter
Name
Default
Notes
align
center
The vertical alignment.
Allowed values are left, center or right.
<content>
<empty>
Your formulae.
Settings
Providing Initialization Options for the MathJax Library
OptionFront Matter The MathJax library is configured with default settings for initialization.
You can overwrite the settings by providing a JSON object in mathJaxInitialize. See MathJax’s documentation for all allowed settings.
Keep in mind that initialization settings of your pages front matter overwrite all settings of your configuration options.
Loading an External Version of the MathJax Library
OptionFront Matter The theme uses the shipped MathJax library by default.
In case you want do use a different version of the MathJax library but don’t want to override the shipped version, you can set customMathJaxURL to the URL of the external MathJax library.
OptionFront Matter The MathJax library will be loaded if the page contains a math shortcode or codefence.
You can force loading the MathJax library if no shortcode or codefence was used by setting math=true. If a shortcode or codefence was found, the option has no effect. This must be set in case you are using the passthrough configuration to render math.
Instead of math=true you can also use the alias math.force=true.
[params]
  math = true
params:
  math: true
{
   "params": {
      "math": true
   }
}
Passthrough Configuration
You can use your math without enclosing it in a shortcode or codefence by using a passthrough configuration
In this case you have to force load the MathJax library either in your hugo.toml or in your page’s front matter as the theme doesn’t know if math is used.
See the example on how a passthrough configurations makes using math really easy.
Examples
Passthrough Block Math
With passthrough configuration enabled you can just drop your math without enclosing it by shortcodes or codefences but no other parameters are available.
In this case you have to force load the MathJax library by setting math=true either in your hugo.toml or in your page’s front matter.
In passthrough default configuration, block math is generated if you use two consecutive $$ as a delimiter around your formulae.
$$\left|
\begin{array}{cc}
a & b \\
c & d
\end{array}\right|$$
$$\left|
\begin{array}{cc}
a & b \
c & d
\end{array}\right|$$
Passthrough Inline Math
The same usage restrictions as of the previous example apply here as well.
In passthrough default configuration, inline math is generated if you use a single $ as a delimiter around your formulae.
Euclid already knew, $\sqrt{2}$ is irrational.
Euclid already knew, $\sqrt{2}$ is irrational.
Codefence Block Math with Right Alignment
If you are using codefences, more parameter are available. Your formulae still needs to be enclosed by $ or $$ as delimiters respectively.
{{ partial"shortcodes/mermaid.html" (dict"page" .
"content""graph LR;\n If --> Then\n Then --> Else""align""center""zoom""true")}}
Codefence syntax is widely available in other Markdown parsers like GitHub and therefore is the recommend syntax for generating portable Markdown.
Parameter
Name
Default
Notes
align
center
The vertical alignment.
Allowed values are left, center or right.
zoom
see notes
Whether the graph is pan- and zoomable.
If not set the value is determined by the mermaidZoom setting of your configurations options or the pages front matter or false if not set at all.
- false: no pan or zoom - true: pan and zoom active
<content>
<empty>
Your Mermaid graph.
Settings
Configuring Pan and Zoom
OptionFront Matter The generated graphs can be panned by dragging them and zoomed by using the mousewheel. On mobile devices you can use finger gestures.
By default this is disabled. Set mermaidZoom=true to enable it.
Individual settings of a graphs zoom parameter have precedence over the page’s front matter and configuration options in that order.
[params]
  mermaidZoom = true
params:
  mermaidZoom: true
{
   "params": {
      "mermaidZoom": true
   }
}
Providing Initialization Options for the Mermaid Library
OptionFront Matter The Mermaid library is configured with default settings for initialization.
You can overwrite the settings by providing a JSON object in mermaidInitialize. See Mermaid’s documentation for all allowed settings.
Note
Using the theme setting in the initialization options is unsupported. To set the theme globally edit the --MERMAID-theme variable of your color variant.
Keep in mind that initialization settings of your pages front matter overwrite all settings of your configuration options.
In addition, you can merge settings for each individual graph through diagram directives on top of the settings of your page’s front matter or configuration options.
Loading an External Version of the Mermaid Library
OptionFront Matter The theme uses the shipped Mermaid library by default.
In case you want do use a different version of the Mermaid library but don’t want to override the shipped version, you can set customMermaidURL to the URL of the external Mermaid library.
OptionFront Matter The Mermaid library will be loaded if the page contains an mermaid shortcode or codefence.
You can force loading the Mermaid library if no shortcode or codefence was used by setting mermaid.force=true. If a shortcode or codefence was found, this option has no effect. This comes handy in case you are using scripting to render a graph.
[params]
  [params.mermaid]
    force = true
params:
  mermaid:
    force: true
{
   "params": {
      "mermaid": {
         "force": true
      }
   }
}
Setting a Specific Mermaid Theme
While you can configure the Mermaid theme to render your graph by using one of the initialization options, the recommended way is to set the default value using the --MERMAID-theme variable in your color variant stylesheet. This allows your graphs to look pretty when the user switches the color variant.
Examples
Flowchart with YAML-Title
```mermaid
---
title: Example Diagram
---
graph LR;
  A[Hard edge] -->|Link text| B(Round edge)
  B --> C{<strong>Decision</strong>}
  C -->|One| D[Result one]
  C -->|Two| E[Result two]
```
---
title: Example Diagram
---
graph LR;
  A[Hard edge] -->|Link text| B(Round edge)
  B --> C{<strong>Decision</strong>}
  C -->|One| D[Result one]
  C -->|Two| E[Result two]
Sequence Diagram with Configuration Directive
```mermaid
%%{init:{"fontFamily":"monospace", "sequence":{"showSequenceNumbers":true}}}%%
sequenceDiagram
  Alice->>John: Hello John, how are you?
  loop Healthcheck
      John->>John: Fight against hypochondria
  end
  Note right of John: Rational thoughts!
  John-->>Alice: Great!
  John->>Bob: How about you?
  Bob-->>John: Jolly good!
```
%%{init:{"fontFamily":"monospace", "sequence":{"showSequenceNumbers":true}}}%%
sequenceDiagram
  Alice->>John: Hello John, how are you?
  loop Healthcheck
      John->>John: Fight against hypochondria
  end
  Note right of John: Rational thoughts!
  John-->>Alice: Great!
  John->>Bob: How about you?
  Bob-->>John: Jolly good!
Class Diagram
```mermaid
classDiagram
  Animal <|-- Duck
  Animal <|-- Fish
  Animal <|-- Zebra
  Animal : +int age
  Animal : +String gender
  Animal: +isMammal()
  Animal: +mate()
  class Duck{
    +String beakColor
    +swim()
    +quack()
  }
  class Fish{
    -int sizeInFeet
    -canEat()
  }
  class Zebra{
    +bool is_wild
    +run()
  }
```
classDiagram
  Animal <|-- Duck
  Animal <|-- Fish
  Animal <|-- Zebra
  Animal : +int age
  Animal : +String gender
  Animal: +isMammal()
  Animal: +mate()
  class Duck{
    +String beakColor
    +swim()
    +quack()
  }
  class Fish{
    -int sizeInFeet
    -canEat()
  }
  class Zebra{
    +bool is_wild
    +run()
  }
State Diagram Aligned to the Right Using Shortcode Syntax
stateDiagram-v2
  open: Open Door
  closed: Closed Door
  locked: Locked Door
  open   --> closed: Close
  closed --> locked: Lock
  locked --> closed: Unlock
  closed --> open: Open
Entity Relationship Model with Non-Default Mermaid Theme
```mermaid
%%{init:{"theme":"forest"}}%%
erDiagram
  CUSTOMER }|..|{ DELIVERY-ADDRESS : has
  CUSTOMER ||--o{ ORDER : places
  CUSTOMER ||--o{ INVOICE : "liable for"
  DELIVERY-ADDRESS ||--o{ ORDER : receives
  INVOICE ||--|{ ORDER : covers
  ORDER ||--|{ ORDER-ITEM : includes
  PRODUCT-CATEGORY ||--|{ PRODUCT : contains
  PRODUCT ||--o{ ORDER-ITEM : "ordered in"
```
%%{init:{"theme":"forest"}}%%
erDiagram
  CUSTOMER }|..|{ DELIVERY-ADDRESS : has
  CUSTOMER ||--o{ ORDER : places
  CUSTOMER ||--o{ INVOICE : "liable for"
  DELIVERY-ADDRESS ||--o{ ORDER : receives
  INVOICE ||--|{ ORDER : covers
  ORDER ||--|{ ORDER-ITEM : includes
  PRODUCT-CATEGORY ||--|{ PRODUCT : contains
  PRODUCT ||--o{ ORDER-ITEM : "ordered in"
User Journey
```mermaid
journey
  title My working day
  section Go to work
    Make tea: 5: Me
    Go upstairs: 3: Me
    Do work: 1: Me, Cat
  section Go home
    Go downstairs: 5: Me
    Sit down: 3: Me
```
journey
  title My working day
  section Go to work
    Make tea: 5: Me
    Go upstairs: 3: Me
    Do work: 1: Me, Cat
  section Go home
    Go downstairs: 5: Me
    Sit down: 3: Me
GANTT Chart
```mermaid
gantt
  dateFormat  YYYY-MM-DD
  title Adding GANTT diagram functionality to Mermaid
  section A section
  Completed task            :done,    des1, 2014-01-06,2014-01-08
  Active task               :active,  des2, 2014-01-09, 3d
  Future task               :         des3, after des2, 5d
  Future task2              :         des4, after des3, 5d
  section Critical tasks
  Completed task in the critical line :crit, done, 2014-01-06,24h
  Implement parser and jison          :crit, done, after des1, 2d
  Create tests for parser             :crit, active, 3d
  Future task in critical line        :crit, 5d
  Create tests for renderer           :2d
  Add to Mermaid                      :1d
```
gantt
  dateFormat  YYYY-MM-DD
  title Adding GANTT diagram functionality to Mermaid
  section A section
  Completed task            :done,    des1, 2014-01-06,2014-01-08
  Active task               :active,  des2, 2014-01-09, 3d
  Future task               :         des3, after des2, 5d
  Future task2              :         des4, after des3, 5d
  section Critical tasks
  Completed task in the critical line :crit, done, 2014-01-06,24h
  Implement parser and jison          :crit, done, after des1, 2d
  Create tests for parser             :crit, active, 3d
  Future task in critical line        :crit, 5d
  Create tests for renderer           :2d
  Add to Mermaid                      :1d
Pie Chart without Zoom
```mermaid {zoom="false"}
pie title Pets adopted by volunteers
  "Dogs" : 386
  "Cats" : 85
  "Rats" : 15
```
pie title Pets adopted by volunteers
  "Dogs" : 386
  "Cats" : 85
  "Rats" : 15
Quadrant Chart
```mermaid
quadrantChart
  title Reach and engagement of campaigns
  x-axis Low Reach --> High Reach
  y-axis Low Engagement --> High Engagement
  quadrant-1 We should expand
  quadrant-2 Need to promote
  quadrant-3 Re-evaluate
  quadrant-4 May be improved
  Campaign A: [0.3, 0.6]
  Campaign B: [0.45, 0.23]
  Campaign C: [0.57, 0.69]
  Campaign D: [0.78, 0.34]
  Campaign E: [0.40, 0.34]
  Campaign F: [0.35, 0.78]
```
quadrantChart
  title Reach and engagement of campaigns
  x-axis Low Reach --> High Reach
  y-axis Low Engagement --> High Engagement
  quadrant-1 We should expand
  quadrant-2 Need to promote
  quadrant-3 Re-evaluate
  quadrant-4 May be improved
  Campaign A: [0.3, 0.6]
  Campaign B: [0.45, 0.23]
  Campaign C: [0.57, 0.69]
  Campaign D: [0.78, 0.34]
  Campaign E: [0.40, 0.34]
  Campaign F: [0.35, 0.78]
Requirement Diagram
```mermaid
requirementDiagram

  requirement test_req {
    id: 1
    text: the test text.
    risk: high
    verifymethod: test
  }

  element test_entity {
    type: simulation
  }

  test_entity - satisfies -> test_req
```
requirementDiagram

  requirement test_req {
    id: 1
    text: the test text.
    risk: high
    verifymethod: test
  }

  element test_entity {
    type: simulation
  }

  test_entity - satisfies -> test_req
```mermaid
C4Context
  title System Context diagram for Internet Banking System
  Enterprise_Boundary(b0, "BankBoundary0") {
    Person(customerA, "Banking Customer A", "A customer of the bank, with personal bank accounts.")
    Person(customerB, "Banking Customer B")
    Person_Ext(customerC, "Banking Customer C", "desc")
    Person(customerD, "Banking Customer D", "A customer of the bank, <br/> with personal bank accounts.")

    System(SystemAA, "Internet Banking System", "Allows customers to view information about their bank accounts, and make payments.")

    Enterprise_Boundary(b1, "BankBoundary") {
      SystemDb_Ext(SystemE, "Mainframe Banking System", "Stores all of the core banking information about customers, accounts, transactions, etc.")

      System_Boundary(b2, "BankBoundary2") {
        System(SystemA, "Banking System A")
        System(SystemB, "Banking System B", "A system of the bank, with personal bank accounts. next line.")
      }

      System_Ext(SystemC, "E-mail system", "The internal Microsoft Exchange e-mail system.")
      SystemDb(SystemD, "Banking System D Database", "A system of the bank, with personal bank accounts.")

      Boundary(b3, "BankBoundary3", "boundary") {
        SystemQueue(SystemF, "Banking System F Queue", "A system of the bank.")
        SystemQueue_Ext(SystemG, "Banking System G Queue", "A system of the bank, with personal bank accounts.")
      }
    }
  }

  BiRel(customerA, SystemAA, "Uses")
  BiRel(SystemAA, SystemE, "Uses")
  Rel(SystemAA, SystemC, "Sends e-mails", "SMTP")
  Rel(SystemC, customerA, "Sends e-mails to")

  UpdateElementStyle(customerA, $fontColor="red", $bgColor="grey", $borderColor="red")
  UpdateRelStyle(customerA, SystemAA, $textColor="blue", $lineColor="blue", $offsetX="5")
  UpdateRelStyle(SystemAA, SystemE, $textColor="blue", $lineColor="blue", $offsetY="-10")
  UpdateRelStyle(SystemAA, SystemC, $textColor="blue", $lineColor="blue", $offsetY="-40", $offsetX="-50")
  UpdateRelStyle(SystemC, customerA, $textColor="red", $lineColor="red", $offsetX="-50", $offsetY="20")

  UpdateLayoutConfig($c4ShapeInRow="3", $c4BoundaryInRow="1")
```
C4Context
  title System Context diagram for Internet Banking System
  Enterprise_Boundary(b0, "BankBoundary0") {
    Person(customerA, "Banking Customer A", "A customer of the bank, with personal bank accounts.")
    Person(customerB, "Banking Customer B")
    Person_Ext(customerC, "Banking Customer C", "desc")
    Person(customerD, "Banking Customer D", "A customer of the bank, <br/> with personal bank accounts.")

    System(SystemAA, "Internet Banking System", "Allows customers to view information about their bank accounts, and make payments.")

    Enterprise_Boundary(b1, "BankBoundary") {
      SystemDb_Ext(SystemE, "Mainframe Banking System", "Stores all of the core banking information about customers, accounts, transactions, etc.")

      System_Boundary(b2, "BankBoundary2") {
        System(SystemA, "Banking System A")
        System(SystemB, "Banking System B", "A system of the bank, with personal bank accounts. next line.")
      }

      System_Ext(SystemC, "E-mail system", "The internal Microsoft Exchange e-mail system.")
      SystemDb(SystemD, "Banking System D Database", "A system of the bank, with personal bank accounts.")

      Boundary(b3, "BankBoundary3", "boundary") {
        SystemQueue(SystemF, "Banking System F Queue", "A system of the bank.")
        SystemQueue_Ext(SystemG, "Banking System G Queue", "A system of the bank, with personal bank accounts.")
      }
    }
  }

  BiRel(customerA, SystemAA, "Uses")
  BiRel(SystemAA, SystemE, "Uses")
  Rel(SystemAA, SystemC, "Sends e-mails", "SMTP")
  Rel(SystemC, customerA, "Sends e-mails to")

  UpdateElementStyle(customerA, $fontColor="red", $bgColor="grey", $borderColor="red")
  UpdateRelStyle(customerA, SystemAA, $textColor="blue", $lineColor="blue", $offsetX="5")
  UpdateRelStyle(SystemAA, SystemE, $textColor="blue", $lineColor="blue", $offsetY="-10")
  UpdateRelStyle(SystemAA, SystemC, $textColor="blue", $lineColor="blue", $offsetY="-40", $offsetX="-50")
  UpdateRelStyle(SystemC, customerA, $textColor="red", $lineColor="red", $offsetX="-50", $offsetY="20")

  UpdateLayoutConfig($c4ShapeInRow="3", $c4BoundaryInRow="1")
Mindmaps
```mermaid
mindmap
  root((mindmap))
    Origins
      Long history
      ::icon(fa fa-book)
      Popularisation
        British popular psychology author Tony Buzan
    Research
      On effectiveness<br/>and features
      On Automatic creation
        Uses
            Creative techniques
            Strategic planning
            Argument mapping
    Tools
      Pen and paper
      Mermaid
```
mindmap
  root((mindmap))
    Origins
      Long history
      ::icon(fa fa-book)
      Popularisation
        British popular psychology author Tony Buzan
    Research
      On effectiveness<br/>and features
      On Automatic creation
        Uses
            Creative techniques
            Strategic planning
            Argument mapping
    Tools
      Pen and paper
      Mermaid
Timeline
```mermaid
timeline
  title History of Social Media Platform
  2002 : LinkedIn
  2004 : Facebook
       : Google
  2005 : Youtube
  2006 : Twitter
```
timeline
  title History of Social Media Platform
  2002 : LinkedIn
  2004 : Facebook
       : Google
  2005 : Youtube
  2006 : Twitter
ZenUML
ZenUML is currently not available with the Mermaid version shipped with the theme due to further required dependencies. Use sequence diagrams instead.
```mermaid
xychart-beta
  title "Sales Revenue"
  x-axis [jan, feb, mar, apr, may, jun, jul, aug, sep, oct, nov, dec]
  y-axis "Revenue (in $)" 4000 --> 11000
  bar [5000, 6000, 7500, 8200, 9500, 10500, 11000, 10200, 9200, 8500, 7000, 6000]
  line [5000, 6000, 7500, 8200, 9500, 10500, 11000, 10200, 9200, 8500, 7000, 6000]
```
xychart-beta
  title "Sales Revenue"
  x-axis [jan, feb, mar, apr, may, jun, jul, aug, sep, oct, nov, dec]
  y-axis "Revenue (in $)" 4000 --> 11000
  bar [5000, 6000, 7500, 8200, 9500, 10500, 11000, 10200, 9200, 8500, 7000, 6000]
  line [5000, 6000, 7500, 8200, 9500, 10500, 11000, 10200, 9200, 8500, 7000, 6000]
Block Diagram
```mermaid
block-beta
columns 1
db(("DB"))
blockArrowId6<[" "]>(down)
block:ID
A
B["A wide one in the middle"]
C
end
space
D
ID --> D
C --> D
style B fill:#969,stroke:#333,stroke-width:4px
```
block-beta
columns 1
db(("DB"))
blockArrowId6<[" "]>(down)
block:ID
A
B["A wide one in the middle"]
C
end
space
D
ID --> D
C --> D
style B fill:#969,stroke:#333,stroke-width:4px
```mermaid
---
config:
  kanban:
    ticketBaseUrl: 'https://mermaidchart.atlassian.net/browse/#TICKET#'
---
kanban
  Todo
    [Create Documentation]
    docs[Create Blog about the new diagram]
  [In progress]
    id6[Create renderer so that it works in all cases. We also add som extra text here for testing purposes. And some more just for the extra flare.]
  id9[Ready for deploy]
    id8[Design grammar]@{ assigned: 'knsv' }
  id10[Ready for test]
    id4[Create parsing tests]@{ ticket: MC-2038, assigned: 'K.Sveidqvist', priority: 'High' }
    id66[last item]@{ priority: 'Very Low', assigned: 'knsv' }
  id11[Done]
    id5[define getData]
    id2[Title of diagram is more than 100 chars when user duplicates diagram with 100 char]@{ ticket: MC-2036, priority: 'Very High'}
    id3[Update DB function]@{ ticket: MC-2037, assigned: knsv, priority: 'High' }

  id12[Can't reproduce]
    id3[Weird flickering in Firefox]
```
---
config:
  kanban:
    ticketBaseUrl: 'https://mermaidchart.atlassian.net/browse/#TICKET#'
---
kanban
  Todo
    [Create Documentation]
    docs[Create Blog about the new diagram]
  [In progress]
    id6[Create renderer so that it works in all cases. We also add som extra text here for testing purposes. And some more just for the extra flare.]
  id9[Ready for deploy]
    id8[Design grammar]@{ assigned: 'knsv' }
  id10[Ready for test]
    id4[Create parsing tests]@{ ticket: MC-2038, assigned: 'K.Sveidqvist', priority: 'High' }
    id66[last item]@{ priority: 'Very Low', assigned: 'knsv' }
  id11[Done]
    id5[define getData]
    id2[Title of diagram is more than 100 chars when user duplicates diagram with 100 char]@{ ticket: MC-2036, priority: 'Very High'}
    id3[Update DB function]@{ ticket: MC-2037, assigned: knsv, priority: 'High' }

  id12[Can't reproduce]
    id3[Weird flickering in Firefox]
Architecture
```mermaid
architecture-beta
  group api(cloud)[API]

  service db(database)[Database] in api
  service disk1(disk)[Storage] in api
  service disk2(disk)[Storage] in api
  service server(server)[Server] in api

  db:L -- R:server
  disk1:T -- B:server
  disk2:T -- B:db
```
architecture-beta
  group api(cloud)[API]

  service db(database)[Database] in api
  service disk1(disk)[Storage] in api
  service disk2(disk)[Storage] in api
  service server(server)[Server] in api

  db:L -- R:server
  disk1:T -- B:server
  disk2:T -- B:db
The notice shortcode shows various types of disclaimers with adjustable color, title and icon to help you structure your page.
There may be pirates
It is all about the boxes.
Usage
> [!primary] There may be pirates
> It is all about the boxes.
{{%noticestyle="primary"title="There may be pirates"icon="skull-crossbones"%}}
Itisallabouttheboxes.
{{%/notice%}}
{{%noticeprimary"There may be pirates""skull-crossbones"%}}
Itisallabouttheboxes.
{{%/notice%}}
{{ partial"shortcodes/notice.html" (dict"page" .
"style""primary""title""There may be pirates""icon""skull-crossbones""content""It is all about the boxes.")}}
Callout syntax has limited features as it does not provide all of the below parameter. Nevertheless, it is widely available in other Markdown parsers like GitHub or Obsidian and therefore is the recommend syntax for generating portable Markdown.
If you want to display a transparent expandable box without any border, you can also use the expand shortcode.
Parameter
Name
Position
Default
Notes
groupid
<empty>
Arbitrary name of the group the box belongs to.
Expandable boxes with the same groupid sychronize their open state.
style
1
default
The style scheme used for the box.
- by severity: caution, important, info, note, tip, warning - by brand color: primary, secondary, accent - by color: blue, cyan, green, grey, magenta, orange, red - by special color: default, transparent, code
The CSS color value to be used. If not set, the chosen color depends on the style. Any given value will overwrite the default.
- for severity styles: a nice matching color for the severity - for all other styles: the corresponding color
This is not available using callout syntax.
title
2
see notes
Arbitrary text for the box title. Depending on the style there may be a default title. Any given value will overwrite the default.
- for severity styles: the matching title for the severity - for all other styles: <empty>
If you want no title for a severity style, you have to set this parameter to " " (a non empty string filled with spaces)
icon
3
see notes
Font Awesome icon name set to the left of the title. Depending on the style there may be a default icon. Any given value will overwrite the default.
- for severity styles: a nice matching icon for the severity - for all other styles: <empty>
If you want no icon for a severity style, you have to set this parameter to " " (a non empty string filled with spaces)
This is not available using callout syntax.
expanded
<empty>
Whether to draw an expander and how the content is displayed.
- <empty>: no expander is drawn and the content is permanently shown - true: the expander is drawn and the content is initially shown - false: the expander is drawn and the content is initially hidden
<content>
<empty>
Arbitrary text to be displayed in box.
Settings
Defining own Styles
Option Besides the predefined style values from above, you are able to define your own.
The style parameter used in a shortcode must match the identifier in the configuration. The title for the style will be determined from the configured title. If no title but a i18n is set, the title will be taken from the translation files by that key. The title may be empty in which case, the box does not contain a default title. icon and color are working similar.
You can also redefine the predefined styles if you’re not satisfied with the default values.
> [!CAUTION]
> Advises about risks or negative outcomes of certain actions.

> [!IMPORTANT]
> Key information users need to know to achieve their goal.

> [!INFO]
> Information that users <ins>_might_</ins> find interesting.

> [!NOTE]
> Useful information that users should know, even when skimming content.

> [!TIP]
> Helpful advice for doing things better or more easily.

> [!WARNING]
> Urgent info that needs immediate user attention to avoid problems.
Caution
Advises about risks or negative outcomes of certain actions.
Important
Key information users need to know to achieve their goal.
Info
Information that users might find interesting.
Note
Useful information that users should know, even when skimming content.
Tip
Helpful advice for doing things better or more easily.
Warning
Urgent info that needs immediate user attention to avoid problems.
the possibilities are endless (almost - including other shortcodes may or may not work) (almost - including other shortcodes may or may not work)
Et Cetera (English: /ɛtˈsɛtərə/), abbreviated to etc., etc, et cet., is a Latin expression that is used in English to mean “and other similar things”, or “and so forth” ↩︎
Expandable Content Area with groupid
If you give multiple expandable boxes the same groupid, at most one will be open at any given time. If you open one of the boxes, all other boxes of the same group will close.
If you want to print out (or generate a PDF) from your OpenAPI documentation, don’t initiate printing directly from the page because the elements are optimized for interactive usage in a browser.
Instead, open the print preview in your browser and initiate printing from that page. This page is optimized for reading and expands most of the available sections.
Parameter
Name
Default
Notes
src
<empty>
The path to the to the OpenAPI specification resource or URL to be used. Resource paths adhere to Hugo’s logical path.
Settings
Enabling Link Warnings
OptionFront Matter You can use openapi.errorlevel to control what should happen if a local OpenAPI specification link can not be resolved to a resource.
If not set or empty, any unresolved link is written as given into the resulting output. If set to warning the same happens and an additional warning is printed in the built console. If set to error an error message is printed and the build is aborted.
Please note that this can not resolve files inside of your static directory. The file must be a resource of the page or the site.
Loading an External Version of the Swagger UI Library
OptionFront Matter The theme uses the shipped Swagger UI library by default.
In case you want do use a different version of the Swagger UI library but don’t want to override the shipped version, you can set customOpenapiURL to the URL of the external Swagger UI library.
OptionFront Matter The Swagger UI library will be loaded if the page contains an openapi shortcode or codefence.
You can force loading the Swagger UI library if no shortcode or codefence was used by setting openapi.force=true. If a shortcode or codefence was found, the option has no effect. This comes handy in case you are using scripting to render a spec.
[params]
  [params.openapi]
    force = true
params:
  openapi:
    force: true
{
"params": {
"openapi": {
"force": true }
}
}
Setting a Specific Swagger UI Theme
The recommended way to configure your Swagger UI theme is to set the default value using the --OPENAPI-theme variable in your color variant stylesheet. This allows your specs to look pretty when the user switches the color variant.
Example
Using Local File
{{< openapisrc="petstore.json" >}}
Resources
The resources shortcode displays links to resources contained in a page bundle.
Multilanguage features are not supported directly by the shortcode but rely on Hugo’s handling for resource translations applied when the theme iterates over all available resources.
Parameter
Name
Default
Notes
style
transparent
The style scheme used for the box.
- by severity: caution, important, info, note, tip, warning - by brand color: primary, secondary, accent - by color: blue, cyan, green, grey, magenta, orange, red - by special color: default, transparent, code
The CSS color value to be used. If not set, the chosen color depends on the style. Any given value will overwrite the default.
- for severity styles: a nice matching color for the severity - for all other styles: the corresponding color
title
see notes
Arbitrary text for the box title. Depending on the style there may be a default title. Any given value will overwrite the default.
- for severity styles: the matching title for the severity - for all other styles: Resources
If you want no title for a severity style, you have to set this parameter to " " (a non empty string filled with spaces)
icon
see notes
Font Awesome icon name set to the left of the title. Depending on the style there may be a default icon. Any given value will overwrite the default.
- for severity styles: a nice matching icon for the severity - for all other styles: paperclip
If you want no icon, you have to set this parameter to " " (a non empty string filled with spaces)
expanded
<empty>
Whether to draw an expander and how the resource list is displayed.
- <empty>: no expander is drawn and the resource list is permanently shown - true: the expander is drawn and the resource list is initially shown - false: the expander is drawn and the resource list is initially hidden
sort
asc
Sorting the output in ascending or descending order.
For further examples for style, color, title and icon, see the notice shortcode documentation. The parameter are working the same way for both shortcodes, besides having different defaults.
SiteParam
The siteparam shortcode prints values of params contained in your hugo.toml.
If you want multiple tabs grouped together you can wrap your tabs into the tabs shortcode.
If you want further options when using a single code tab, you can also use the highlight shortcode.
Parameter
Name
Default
Notes
style
see notes
The style scheme used for the tab. If you don’t set a style and you display a single code block inside of the tab, its default styling will adapt to that of a code block. Otherwise default is used.
- by severity: caution, important, info, note, tip, warning - by brand color: primary, secondary, accent - by color: blue, cyan, green, grey, magenta, orange, red - by special color: default, transparent, code
This will set the background to a lighter version of the chosen style color as configured in your theme variant.
Only the color parameter is set.
This will set the background to a lighter version of the chosen CSS color value.
The style parameter affects how the color parameter is applied.
The default style will set the background to your --MAIN-BG-color as configured for your theme variant resembling the default style but with different color.
The style parameter is set to a severity style.
This will set the background to a lighter version of the chosen style color as configured in your theme variant and also affects the chosen icon.
The style parameter affects how the color parameter is applied.
This will set the background to a lighter version of the chosen CSS color value and also affects the chosen icon.
Tabs
The tabs shortcode displays arbitrary content in an unlimited number of tabs.
If you just want a single tab you can instead call the tab shortcode standalone.
Also follow the above link to see the parameter for a nested tab.
Parameter
Name
Default
Notes
groupid
<random>
Arbitrary name of the group the tab view belongs to.
Tab views with the same groupid sychronize their selected tab. The tab selection is restored automatically based on the groupid for tab view. If the selected tab can not be found in a tab group the first tab is selected instead.
This sychronization applies to the whole site!
style
<empty>
Sets a default value for every contained tab. Can be overridden by each tab. See the tab shortcode for possible values.
color
<empty>
Sets a default value for every contained tab. Can be overridden by each tab. See the tab shortcode for possible values.
In case you want to nest tab views, the parent tab that contains nested tab views needs to be declared with {{< tab >}} instead of {{% tab %}}. Note, that in this case it is not possible to put markdown in the parent tab.
You can also set style and color parameter for all tabs and overwrite them on tab level. See the tab shortcode for possible values.
{{ partial"shortcodes/tree.html" (dict"page" .
"content"`- home | folder
- [.config](http://example.com) | folder
- My Documents | folder | magic
- home.php | fa-fw fab fa-php | #888cc4`)}}
Codefence syntax is widely available in other Markdown parsers like GitHub and therefore is the recommend syntax for generating portable Markdown.
Parameter
Name
Default
Notes
<content>
<empty>
Your list as Markdown.
Item Syntax
<NAME> [ |<ICON> [ |<COLOR> ] ]
The NAME can be followed by an optional pipe (|) to define an ICON and further optional pipe to define the icon’s COLOR.
ICON: Font Awesome icon name set to the left of the NAME. If you give a single string, it is selected from Font Awesome’s solid icons. If you want to use a different set, you have to give the complete styles after the double colons. See above example for the home.php.
COLOR: The CSS color value to be used. If not set, the primary color will be used.
You can also set a style value known from other shortcodes.
by severity: caution, important, info, note, tip, warning
by brand color: primary, secondary, accent
by color: blue, cyan, green, grey, magenta, orange, red
This site supports a “dark mode” CSS feature. It is implemented through the variant selector in the menu to the left
Embed & Teleprompter
This site also creates two additional outputs of each page, also accessible from the upper toolbar:
- Teleprompter View (add tele.html to the URL)
- Embedded View (add embed.html to the URL)
Teleprompter View
The teleprompter view is intended to be used on a mirrored teleprompter. It uses some customized CSS in custom.css.
It also includes JavaScript code to handle automatically scrolling the page by clicking the mouse, and mirroring/unmirroring the output using the m button. Other buttons are programmed to match an IKAN bluetooth remote. See tele-scroll.js for details.
It also uses an override for the Hugo YouTube shortcode to hide any embedded YouTube videos. See /layouts/shortcodes/youtube.tele.html.
Embedded View
The embedded view renders the page without any additional navigation elements. This view is meant to be embedded in an <iframe> directly in another site, such as an LMS. It also removes any noiframe notices. See custom.css for details.
Salutations! My name is Russell Feldhausen, and currently it is my honor to serve as the vice president of the All Souls Board of Trustees. At our October board meeting, we approved a plan to return to in-person services starting on November 7th. We also set a goal to clearly communicate about this process to the congregation. So, in that spirit, here is some information about our current plan for in-person services. As many of you know, I work in education, so please forgive me as I slip into “teacher mode” for a bit to share all of this information.
First, we are tracking the risk level metric for the Kansas City Metro Area on Covid Act Now as our metric for determining whether it is safe to hold in-person services. That metric includes data from 14 area counties, and aggregates many data points together in a single value. If the risk level is Low, Medium, or High, we will be open for in-person services. However, if the risk value increases to Very High or Severe, we will immediately cease in-person services. If that happens, we’ll send out a notice to everyone.
As part of this plan, we are taking several precautions to protect all of our members from unnecessary exposure and risk. This plan is still constantly evolving, and we’ll be making changes from time to time. In addition, we hope that many of these precautions will be temporary, and we can continue to reduce them as the risk level improves.
Current precautions:
Masks are required for anyone 3 and up
Proof of full vaccination required for anyone 12 and up. We will follow CDC recommendations, so if they update those recommendations to include booster shots, we’ll aim to comply with that.
No food or drink. We won’t be serving coffee or snacks, and we ask you not to bring your own. Save that coffee run for after service!
Anyone who feels ill or has symptoms associated with COVID-19 should stay home
We will have separate, designated spaces for various groups during service. More about that later
We will limit entry to the building to just the doors off the parking lot that lead into the lobby and Conover.
The facilities committees has worked to improve airflow and filtration in the building to reduce risk from airborne exposure
We’ll have plenty of masks and sanitizer available for anyone who needs it
Of course, there are some reasonable exceptions to these precautions for staff and persons participating from the stage during service.
Now, for the most important part - we will be requiring reservations to attend in-person Sunday services in Bragg, as well as to attend the in-person RE classes. This will help us maintain proper social distance and make sure we can set up proper seating and spaces for everyone. Again, we hope that this is a temporary restriction that can be relaxed as the risk level improves.
Each week, we’ll send out a link to an online form for reservations on the Monday prior to an in-person service. That form will allow you to choose from four different reservation types:
Assigned seating - each person or group will have assigned seats that are separated from other groups by 6 feet. This section will also be the furthest away from RE students and unmasked singers on the stage, so it is best for anyone who wishes to be more careful. This section is open to fully vaccinated adults and youth 12 and up.
Mingle seating - in this section, persons or groups will be able to move chairs around a bit to form new groups. By choosing this option, you indicate that you are OK with sitting next to other fully vaccinated people outside your household. This section is open to fully vaccinated adults and youth 12 and up.
Parents - parents who have regular contact with children under 12 will have their own section in Bragg. Those parents will enter the building through the Conover doors with the RE students, and should proceed directly to Bragg unless their child needs their presence in Conover. This will make it easy for RE teachers to locate parents if needed, and will minimize unnecessary exposure between sections
RE Students - RE students will sign up by age group. When they arrive through what I’ve been told will be an amazingly decorated door, they will meet their RE teachers in Conover. At the start of service, they will proceed as a group to Bragg and be present for the first part of the service. After that, they will follow their RE teachers back to other designated areas in the church.
You’ll also have the option to reserve a seat to watch the Forum. We’ll have a limited number of seats in a room set aside for watching Forum, but you’ll need to bring your own device if you want to ask questions via chat during Forum discussion.
We also understand that reservations will probably fill up, so our form will also have a waitlist option that you may choose. Persons on the waitlist will be notified if space becomes available throughout the week, and anyone remaining on the waitlist will be given priority and the first opportunity to make a reservation for the following week’s service.
All of this information will be posted to our website at http://allsoulskc.org/reservations. If you prefer to make your reservation via phone, you are welcome to call the church Monday through Friday between 10 AM and 3 PM and someone there would be happy to assist you.
As part of this process, we’ll need to verify full vaccination status for anyone 12 years and older who attends an in-person service. To simplify this process, there are a few ways to do this:
Online Form - we have an online form where you can upload a picture of your vaccination card. Once you’ve done that, we’ll have a record of it and can pre-print a nametag for your reservation that includes your vaccination status, so you’ll effectively have a fast-pass to enter the building when you arrive. You can find the online form on the Reservations website, or in the Flicker for the past several weeks.
In Person - you may bring your vaccination card, or a copy or picture of it, to church on Sunday and we’ll have someone there to verify it. Once we’ve done that once, again we’ll have a record of it for future services. If you plan to bring your card with you, we ask that you arrive before 11 AM to give us enough time to get everyone verified before service begins.
Privately - if you’d like to protect your information, we’ll also have a board member or other designated person on duty each Sunday that you can show your card to privately, and they’ll get you verified.
Any visitors who wish to join us are welcome to fill out the online reservation form as well. However, we will also reserve a few spaces for visitors to join us even without reservations. We want to be an open and welcoming church for all those who wish to join us so we can continue to grow. Of course, all visitors must also be masked and show proof of vaccination to enter the building.
Finally, we are in need of several volunteers to help us implement all of these precautions. As an incentive, volunteers will be able to attend most of the in-person service each week they are volunteering. If you’d like to volunteer, there is a form on our reservations page you can fill out, or feel free to contact a board member.
We understand that this is complex, and you may have questions that we haven’t answered yet. We are compiling a list of Frequently Asked Questions to be published to our website soon. So, if you have any questions at all, I invite you to email us at board@allsoulskc.org, or contact any board member. We’ll also be watching our Facebook page and group and participating in discussions there.
On behalf of the entire All Souls Board of Trustees, we thank you for your patience and support as we take this next step. It is truly a privilege to serve this community.
Documentation
Helpful Documentation for K-State CS Textbooks
Subsections of Documentation
Textbook From Scratch
This gives the basic steps for creating a brand new Hugo textbook from scratch.
Remove the [params.plausible] section - it is not used by the textbooks site.
Preview the site using hugo serve. It will be available at the URL given in the output. If the site loads with default content, then it is working.
Additional Configuration
Perform a few additional steps to make things work smoothly.
Create a .gitignore file in the site’s base directory with the following content:
/public//resources/_gen.hugo_build.lock
If you are using Visual Studio Code to edit the site, create a .vscode folder in the site’s base directory, and then a settings.json file inside of that directory with the following content to change the sort order of your editor’s file explorer:
{
"explorer.sortOrder": "mixed"}
GitLab Repository Setup
Once the site is working locally, set up a repository on the CS GitLab server to store the data.
We recommend storing the textbook in the CS Textbooks group. Contact another textbook author to get access.
Create a repository that matches your textbook name. Use the other repositories as a naming guide. Do not initialize the repository in GitLab by creating a README file.
You can choose to make your repository private (accessible only to the group), internal (accessible to anyone with a CS account), or public (accessible to anyone). Only those with permissions can update the repository (typically group members), but others may be able to view the content.
In the site directory on your local system, add the repository’s URL as a remote: git remote add origin <url>
Commit and push: git commit -m "Initial Commit" && git push -u origin main (substitute master for main if needed)
5. Make sure that you don’t commit the .hugo_build.lock file - it should be excluded via the .gitignore file created above.
Initial Content Creation
Now that the site is working, it is time to create some basic content.
Homepage
To create a home page, create a new _index.md file in the content directory. It should have at least the following content:
+++
archetype = "home"
title = "Homepage"
+++
Lorem Ipsum
You can also create this page using the command hugo new --kind home _index.md from the site’s directory and then modifying the content a bit.
To create a chapter, first create a folder with the chapter’s name in the content directory. We recommend including a number in front of the name to help with sorting, such as 01-introduction. Then, inside of that folder, create a new _index.md file with the following content:
+++
archetype = "chapter"
ordinal = "1"
title = "Introduction"
pre = "<b>1. </b>"
weight = 1
+++
Lorem Ipsum.
You can also create this page using the command hugo new --kind chapter 01-introduction/_index.md from the site’s directory and then modifying the content a bit.
Content Page
To create a content page, simply create a file inside of the desired directory with the .md file extension. Like chapters, we recommend adding a number in front of the file name to help with sorting, such as 01-welcome.md. Place the following content in the page:
You can also create this page using the command hugo new 01-introduction/01-welcome.md from the site’s directory and then modifying the content a bit.
Tip
Notice that the front matter for the homepage and chapters use plus symbols +++ as delimiters, while the content pages themselves use dashes --- instead. This is done by convention in this particular theme, and we follow that in this documentation. The plus symbols +++ indicate that the front matter is written in TOML while the dashes --- indicate that the front matter is written in YAML. The biggest difference is that TOML uses the equals symbol = for assignment, while YAML uses a colon : instead. See Front Matter Formats for more information.
Note
When creating this page using the command, it will add draft: true to the front matter. You’ll want to remove that so it appears on the site, or use hugo serve -D to include drafts files when previewing the site. It will also include the date, which can be safely removed - the theme will use the date of the latest commit to GitLab that includes this file instead.
Logo
The site right now uses a default logo based on the site’s title in config.toml. To override that, create a file at layouts/partials/logo.html in the site with the following content:
<aid="logo"href="{{ .Site.Home.RelPermalink | default ("/"|relLangURL)}}">
Hugo Starter
</a>
Replace the text with the desired logo content. Alternatively, an image can be used. Place the image in the static/images/ folder and adapt the following HTML:
The sidebar footer can also be overridden by creating a file at layouts/partials/menu-footer.html. It is best to simply copy the existing content in themes/hugo-theme-relearn/layouts/partials/menu-footer.html and edit it from that template.
Additional Content
From there, you can continue to create additional chapters and pages as needed. For more advanced content structures, look through the source code to this site. It includes examples for page bundles, leaf bundles, hidden pages, non-printable pages, syllabus pages, video content, historical content, and more.
Textbook From Starter
This gives the basic setup for a new textbook based on a starter repository.
Clone Starter Repository
Install Hugo from the Hugo Releases. You should have version 0.101.0 or higher.
Clone the Starter Repository on GitLab or GitHub to your local system: git clone <url> <directory>.
Open the site’s directory: cd <directory>.
Initialize git submodules: git submodule init.
Recursively pull submodules: git pull --recurse.
Update the config.toml file:
Update the baseURL at the top to match the URL where the site will eventually be deployed.
Update the title to match the site’s name
Under [params], update the following:
editURL to match the location where files can be edited in GitLab or GitHub.
author used for metadata
description used for metadata
commitURL to match the location where individual commits can be found.
Preview the site using hugo serve. It will be available at the URL given in the output. If the site loads with default content, then it is working.
GitLab Repository Setup
Once the site is working locally, set up a repository on the CS GitLab server to store the data.
We recommend storing the textbook in the CS Textbooks group. Contact another textbook author to get access.
Create a repository that matches your textbook name. Use the other repositories as a naming guide. Do not initialize the repository in GitLab by creating a README file.
You can choose to make your repository private (accessible only to the group), internal (accessible to anyone with a CS account), or public (accessible to anyone). Only those with permissions can update the repository (typically group members), but others may be able to view the content.
In the site directory on your local system, add the repository’s URL as the new remote: git remote set-url origin <url>
Commit and push: git commit -m "Initial Commit" && git push -u origin main (substitute master for main if needed)
5. Make sure that you don’t commit the .hugo_build.lock file - it should be excluded via the .gitignore file in the initial repository.
Logo
The site right now uses a default logo based on the site’s title in config.toml. To override that, create a file at layouts/partials/logo.html in the site with the following content:
<aid="logo"href="{{ .Site.Home.RelPermalink | default ("/"|relLangURL)}}">
Hugo Starter
</a>
Replace the text with the desired logo content. Alternatively, an image can be used. Place the image in the static/images/ folder and adapt the following HTML:
The sidebar footer can also be overridden by creating a file at layouts/partials/menu-footer.html. It is best to simply copy the existing content in themes/hugo-theme-relearn/layouts/partials/menu-footer.html and edit it from that template.
Additional Content
The starter repository contains all of the basic content covered in the Textbook from Scratch page.
From there, you can continue to create additional chapters and pages as needed. For more advanced content structures, look through the source code to this site. It includes examples for page bundles, leaf bundles, hidden pages, non-printable pages, syllabus pages, video content, historical content, and more.
Deploying Textbook
This page gives the basic instructions for deploying a textbook to the server. It is mainly meant as a reference for the server’s administrators, but it is helpful for everyone to understand the process.
Clone Repository on Server
Log in to the server via SSH and switch to the textbooks account: sudo su textbooks.
Change directory to the textbooks user’s home directory: cd ~.
Clone the repository into this folder: git clone <url> <directory>.
Change directory to the textbook’s directory: cd <directory>.
Initialize submodules: git submodule init.
Recursively pull submodules: git pull --recurse.
Log out of the textbooks account: exit.
Set up Webhook on Server
Switch to the config account: sudo su config.
Change directory to the config user’s home directory: cd ~.
Edit the webhook/webhook.conf file to add a new webhook.
In general, just copy an existing webhook definition and edit to match the new site. Be Careful! The configuration file is JSON and is very picky about proper JSON syntax.
id: this is the identifier for the webhook used in the URL
execute-command: see the scripts in the /home/config/bin directory.
command-working-directory: this is the directory where the textbook repository is stored.
deploy.sh will use the default version of Hugo
deploy-101.sh will use Hugo version 0.101.0
pass-arguments-to-command: this determines the folder where the content will be deployed. The name should match the URL desired (e.g. hugo-starter will deploy at https://textbooks.cs.ksu.edu/hugo-starter)
trigger-rule: is used to determine if the webhook request is valid. Change the value to match the key given when setting up the webhook in GitLab.
Set up Webhook on GitLab
Open the repository on GitLab and navigate to the Settings -> Webhooks menu.
Add a hook using the following settings:
URL: http://pacer.cs.ksu.edu:9000/hooks/<hook_id>
Secret Token: <secret>
Trigger: Push events
You can specify a specific branch; I typically leave this blank.
Uncheck SSL Verification - we currently don’t have an SSL certificate on the webhook server.
Click Add Webhook to save.
Once saved, click the Test option and choose Push Event to test it. It should quickly return HTTP 200 at the top of the page if it is working.
Update Permissions
After the first deployment, on the server, go to the web directory: cd /var/www/textbooks.cs.ksu.edu
Update the permissions on the new directory:
sudo chown -R textbooks:www-data <directory>
sudo chmod -R g+w <directory>
Update Homepage
Log in to the server via SSH and switch to the textbooks account: sudo su textbooks.
Edit the site’s homepage at /var/www/textbooks.cs.ksu.edu/index.html to include a link to the new site.
Save the file, and then log out of the textbooks account: exit.
Save Configuration
Switch to the config account: sudo su config.
Change directory to the config user’s home directory: cd ~.
Copy the updated index.html file to the nginx folder: cp /var/www/textbooks.cs.ksu.edu/index.html ~/nginx/.
Use git to commit and push the changes to the server configuration to GitLab.
The only files changed should be webhook/webhook.conf and nginx/index.html.
Log out of the config account: exit.
Notifications
Deployment notifications are sent to a Discord server. Contact one of the other textbook authors to get access to that Discord server. It is helpful if you want to see that your deployments are starting and completing correctly.
Debugging
Deployment logs are stored in the /home/textbooks/<name>.log file. This can be helpful for debugging.
Updating the Theme
From time to time, the underlying Hugo Theme Relearn clone may be updated. This page gives the directions for updating your textbook to the latest theme.
Save and commit any work done on the textbook and push to GitLab. Wait until the deployment completes before continuing.
In the site’s directory, open the themes/hugo-theme-relearn directory: cd themes/hugo-theme-relearn.
Check out the main branch of the theme if you haven’t already: git checkout main.
Pull the latest version of the theme: git pull.
Change directory back to the site’s directory: cd ../../.
Preview the changes: hugo serve.
If everything looks good, commit and push: git commit -m "Update Theme" && git push
It should show modified: themes/hugo-theme-relearn (new commits) when running git status to confirm that the theme is being updated.
The site should deploy with the new theme.
Setting Up Backups
To provide extra security, you can also set up a live backup of your textbook to be hosted on GitHub. This page gives the instructions for setting this up.
Create GitHub Repository
If you haven’t already, ask another textbook author to join the ksu-cs-textbooks organization on GitHub.
Create a new repository on the ksu-cs-textbooks organization on GitHub.
The name of the repository should match the desired URL for your textbook (e.g. https://ksu-cs-textbooks.github.io/<repo_name>)
Do not initialize the repository with a README file.
The repository itself should be private.
Mirror GitLab Repository to GitHub
On the CS GitLab Server, open the repository and go to the Settings -> Repository menu.
Expand the Mirroring Repositories section.
In the Git repository URL, enter the SSH URL for the GitHub repository in the box.
You must add ssh:// to the front of the repository, and also change the colon between the hostname and the organization name to a slash /.
For example, git@github.com:ksu-cs-textbooks/hugo-starter.git becomes ssh://git@github.com/ksu-cs-textbooks/hugo-starter.git
For Mirror Direction choose Push
Click the Detect Host Keys button. It should show a key fingerprint for GitHub in a few seconds. THIS IS IMPORTANT! There is no way to do this after the fact.
For Authentication Method choose SSH Public Key.
Do not check Keep divergent refs - since we don’t want to commit directly to GitHub, we don’t need this.
Checkmark Mirror only protected branches. Only the main or master branch will be mirrored.
Click Mirror Repository to save the settings.
Once that is done, you’ll need to add an SSH public key to your GitHub Account.
Click the Copy SSH Public Key button in the list of mirrored repositories on GitLab.
Click New SSH Key and paste that key. Give it a name like CS GitLab <Textbook> to help keep track of it.
Click Add SSH Key to save it.
Go back to GitLab, and click the Update Now button (right next to the Copy SSH Public Key button). That will try to mirror the repository. After a few seconds, you should see the content appear in GitHub.
Update the Website
In order to properly build the backup site on GitHub, several changes must be made to the existing website directory.
Create a folder .github to store GitHub specific configuration files.
Create the file .github/workflows/gh-pages.yml with the following content:
# https://github.com/peaceiris/actions-hugoname: GitHub Pageson:
push:
branches:
- main # Set a branch to deploypull_request:
jobs:
deploy:
runs-on: ubuntu-20.04concurrency:
group: ${{ github.workflow }}-${{ github.ref }}steps:
- uses: actions/checkout@v3with:
submodules: true# Fetch Hugo themes (true OR recursive)fetch-depth: 0# Fetch all history for .GitInfo and .Lastmod - name: Setup Hugouses: peaceiris/actions-hugo@v2with:
hugo-version: '0.101.0'# extended: true - name: Buildrun: hugo -b "https://ksu-cs-textbooks.github.io/hugo-starter" - name: Deployuses: peaceiris/actions-gh-pages@v3if: ${{ github.ref == 'refs/heads/main' }}with:
github_token: ${{ secrets.GITHUB_TOKEN }}publish_dir: ./public
Update the -b "https://ksu-cs-textbooks.github.io/hugo-starter" to match the URL where the site will be deployed (e.g. https://ksu-cs-textbooks.github.io/<repo_name>)
Update the two instances of main to master if needed to match your repository configuration. You can also update the value of the hugo-version variable to match your desired Hugo version.
Note
For more advanced configuration, copy config.toml to github.toml and then edit that file to update the baseURL and other settings. Update the command to hugo --config github.toml to use that configuration file for deployment on GitHub.
[Optional] Create the file .github/dependabot.yml with the following content:
This will help keep any underlying GitHub actions updated, and it will also send emails when the theme has been updated.
Once these changes are made, commit and push them to GitLab. You should also see them mirrored to GitHub as well.
Configure GitHub Pages Environment
Now that the site has the required GitHub configuration, we need to set up GitHub Pages to deploy the rendered site.
Once the site is updated, GitHub should automatically run the gh-pages action. You can click the Actions tab on GitHub to see that the action completed successfully.
On the GitHub repository, click the Settings tab and navigate to the Pages option.
Under the Branch heading, choose the gh-pages branch and the / (root) folder, then click Save
After a minute or so, the GitHub Pages deployment should finish. On the main repository page, you should see is as an active environment on the right side.
Once that is done, you can click on the github-pages environment, and click View Deployment to see the live version of the site.
Add to Homepage
The textbook backups are listed on the homepage available at https://ksu-cs-textbooks.github.io/. That page can be updated by editing this index.html page in the base repository. Anyone who is an owner of the group should be able to edit it. When you commit an edit to that page, it will automatically deploy and update.
Switching to New Theme
Warning
This page gives instructions for switching an existing textbook using the previous theme to the new version of Hugo Theme Relearn. Only use these instructions once per textbook!
Update Hugo
The new theme requires Hugo version 0.101.0 or higher. Install Hugo from the Hugo Releases.
Add any custom parameters used in the previous site.
Once all updates have been made, delete the config.toml.bak file.
Updating Other Configurations
Depending on how the site is used, the following other configuration updates must be made.
GitHub Backups
If the site is set up for GitHub backups, there are two options:
If github.toml is present, and you’d like to continue using multiple configuration files, replace it with the current contents of the config.toml file and update the baseURL to match what was previously in the github.toml file (e.g. https://ksu-cs-textbooks.github.io/<repo_name>). Ensure that the hugo command in .github/workflows/gh-pages.yml is hugo --config github.toml so that the correct file will be used.
If github.toml is not present, or you’d like to simplify the configuration, set the hugo command in the .github/workflows/gh-pages.yml file to be hugo -b "https://ksu-cs-textbooks.github.io/<repo_name>" and update <repo_name> to match the correct URL. This will use the config.toml file but override the baseURL when building it.
In addition, you should confirm that the hugo-version setting in .github/workflows/gh-pages.yml is set to 0.101.0.
Docker images
If the site is set up to build Docker images, there are two options:
If docker.toml is present, and you’d like to continue using multiple configuration files, replace it with the current contents of the config.toml file and update the baseURL to match what was previously in the docker.toml file (e.g. https://<name>.textbooks.cs.ksu.edu). Ensure that the hugo command in the Dockerfile is hugo --config docker.toml so that the correct file will be used.
If docker.toml is not present, or you’d like to simplify the configuration, set the hugo command in the Dockerfile to be hugo -b "https://<name>.textbooks.cs.ksu.edu" and update <name> to match the correct URL. This will use the config.toml file but override the baseURL when building it.
In addition, you should confirm that the HUGO_VERSION argument in the Dockerfile is set to 0.101.0.
Finally, since we aren’t currently using Docker images yet, you may wish to configure your textbook to only create a Docker image when a new tag is pushed, or disable this completely for the time being. See the Docker Container page for more information.
Updating layouts
If the site has overridden any layouts in the layouts folder, they should be reviewed and updated as needed.
layouts/partials/logo.html - the default logo will use the title from the config.toml file as a clickable link. If this is desired, then delete layouts/partials/logo.html. Otherwise, update it using the following templates as a guide:
Static Text
<aid="logo"href="{{ .Site.Home.RelPermalink | default ("/"|relLangURL)}}">
Hugo Starter
</a>
layouts/partials/menu-footer.html - the default menu footer gives information about the site and the CC-BY-NC-SA license. If this is desired, then delete the layouts/partials/menu-footer.html from the site. Otherwise, update it using the following templates as a guide (change only the second paragraph to your desired license information).
Note
The footer works best with a bit of inline HTML to fix the design. I left it this way since it was easier to override than trying to adjust it in the base theme, since updates to the base theme’s CSS may cause issues.
Default Footer
<style>
#footer {
font-size: 13px;
margin-left: auto;
margin-right: auto;
padding: 2rem1rem;
min-width: 230px;
max-width: 300px;
}
#footer p {
margin: 0;
}
</style>
<p>Built using <ahref="http://gohugo.io/">Hugo</a> and <ahref="https://github.com/ksu-cs-textbooks/hugo-theme-relearn">Hugo Relearn Theme</a>.</p>
<p><arel="license"href="http://creativecommons.org/licenses/by-nc-sa/4.0/"><imgalt="Creative Commons License"style="border-width:0; margin: .5rem auto"src="https://i.creativecommons.org/l/by-nc-sa/4.0/88x31.png" /></a><br />This work is licensed under a <arel="license"href="http://creativecommons.org/licenses/by-nc-sa/4.0/">Creative Commons Attribution-NonCommercial-ShareAlike 4.0 International License.</a></p>
CC Course Footer with License and Attribution Info
<style>
#footer {
font-size: 13px;
margin-left: auto;
margin-right: auto;
padding: 2rem1rem;
min-width: 230px;
max-width: 300px;
}
#footer p {
margin: 0;
}
</style>
<p>Built using <ahref="http://gohugo.io/">Hugo</a> and <ahref="https://github.com/ksu-cs-textbooks/hugo-theme-relearn">Hugo Relearn Theme</a>.</p>
<p><arel="license"href="http://creativecommons.org/licenses/by-nc-sa/4.0/"><imgalt="Creative Commons License"style="border-width:0; margin: .5rem auto"src="https://i.creativecommons.org/l/by-nc-sa/4.0/88x31.png" /></a><br />This work is licensed under a <arel="license"href="http://creativecommons.org/licenses/by-nc-sa/4.0/">Creative Commons Attribution-NonCommercial-ShareAlike 4.0 International License.</a> See <ahref="https://core.cs.ksu.edu/license">License & Attribution</a> for details.</p>
Front Matter Changes
By default, the site will now create a printable version of all pages. To remove a page or group of pages from the printed view (such as announcements or assignments pages), add noprint = true (TOML) or noprint: true (YAML) to the front matter of a page or chapter. Any pages beneath that page in the tree will not be included in the print view. By default, all hidden pages will also not be included (but they also won’t be visible in the sidebar menu).
The template no longer includes code for the section: true front matter option - it should be switched to chapter: true to get the chapter header formatting, otherwise it can be removed entirely.
The date option is no longer used. It can be deleted or ignored.
This may be an incomplete list of front matter changes - if you run into additional front matter issues when upgrading, let me know and I’ll update this document.
Content Changes
LaTeX Math
Hugo Theme Relearn changed the way that LaTeX math is handled in markdown. Now it is best to either include it in a shortcode or a code fence instead of just using dollar signs $ directly in the markdown. See the Hugo Theme Relearn Documentation for additional details.
In general, any inline LaTeX using single dollar signs $ should be wrapped with the new math shortcode, as in $e^x$.
For multiline LaTeX using two dollar signs $$, use the math codefence:
syllabus - this is a new shortcode to replace the previous include shortcodes for default syllabus statements. See the Syllabus Shortcode Documentation for how to use it.
quizdown - this is an implementation of the Quizdown plugin to add short quizzes to the site.
Updated Shortcodes
include - this shortcode should now use the < > delimiters instead of % %. Using < > will prevent the Markdown renderer from rendering the content twice, resulting in extra spacing around URLs and other strange formatting issues. See Shortcodes for more information on the different shortcode delimiters. See Custom Include Shortcode Documentation and Default Include Shortcode Documentation for more details on the shortcode itself. It should now support other shortcodes in included files! I recommend running a quick search for something like {% include and {%include to catch most of these and review them on the rendered site before committing.
Note
If you are including files from the previous theme, such as the default syllabus statements, you should update the path to the new theme or consider using the new syllabus shortcode for this.
notice - this shortcode has many new features, and the syntax for it is slightly different (only if you were using custom titles or icons - the base notice shortcode hasn’t changed). See Noiframe Notice Shortcode Documentation and Notice Shortcode Documentation for more information.
Deprecated Shortcodes
link - the link shortcode has been removed. Now, the default HTML renderer is configured to have a link either open in the same tab if it is a local link (does not have http in the URL), otherwise it will open in a new tab if the link goes to an external site. See Link Shortcode for more information. All links can now be converted to standard Markdown syntax [Link Name](link_url) or replaced with an HTML <a href="link_url" target="_blank" rel="noopener">Link Name</a> tag. You may also want to review the relref function in Hugo to generate relative links to pages within the site that use the correct base URL.
norender - the norender shortcode has been removed. It can be replaced by enclosing the content in a <pre> </pre> HTML element.
static - the static shortcode has been removed. Any files in the /static folder within the site are now accessible using direct URLs. For example, a file at /static/images/logo.png can be included using . As long as the baseURL and canonifyURLs settings in config.toml are correct, Hugo will automatically update these URLs to the correct path.
Note
This may be an incomplete list of shortcode changes - if you run into additional shortcode issues when upgrading, let me know and I’ll update this document.
Preview Content
At this point, you should preview the content in your site using hugo serve and ensure that it looks correct. If everything is working properly, then continue. If not, feel free to contact the theme maintainer for assistance.
Update Deployment
Warning
As of August 2022, the server has not been updated to use a newer version of Hugo by default. Therefore, before deploying an updated site, contact one of the server administrators to have your site’s webhook updated to use the deploy-101.sh deployment script, which uses the new version of Hugo.
Commit and Push to Test Deployment
If everything is working correctly, you should be able to commit and push. Make sure that everything has deployed and updated properly. You may have to clear your browser’s cache using CTRL+F5 or CMD+F5 to get the latest version of the CSS file.
If anything doesn’t look correct, contact the theme maintainer for assistance.
Removing the Old Theme
Once everything is working properly, you should remove the old theme from your repository using these commands:
After updating the textbook on one system, it is recommended to delete and re-clone the repository on any other systems that are using it. That will give the cleanest version of the updated repository without any residual files from the previous theme. Run these commands starting outside of the site’s directory, where <directory> is the directory containing the site.
git clone <url> <directory> will clone the existing git repository at <url> into the local directory <directory>.
cd <directory> will change the current working directory to be the directory where the site is stored.
git submodule init will initialize the submodules for this repository. We use git submodules to keep track of the theme and make it easy to update the theme as needed.
git pull --recurse will pull the latest version of the repository AND the theme. The theme will be locked to a specific version unless you go through the steps to Update the Theme.
Creating a Docker Container
The Hugo textbooks can also be deployed into a Docker container.
Dockerfile
Create a file named Dockerfile in the site’s base directory with the following content:
FROM nginx:alpine as buildRUN apk add --update \
wget gitARG HUGO_VERSION="0.101.0"RUN wget --quiet "https://github.com/gohugoio/hugo/releases/download/v${HUGO_VERSION}/hugo_${HUGO_VERSION}_Linux-64bit.tar.gz"&&\
tar xzf hugo_${HUGO_VERSION}_Linux-64bit.tar.gz &&\
rm -r hugo_${HUGO_VERSION}_Linux-64bit.tar.gz &&\
mv hugo /usr/binCOPY ./ /siteWORKDIR /siteRUN hugo -b "https://hugo-starter.textbooks.cs.ksu.edu"#Copy static files to NginxFROM nginx:alpineCOPY --from=build /site/public /usr/share/nginx/htmlWORKDIR /usr/share/nginx/html
Update the following items in this file to match your desired configuration:
The HUGO_VERSION argument should be set to the version of Hugo used for the site.
The RUN command should include the URL that the site will be deployed to after the -b flag. Alternatively, copy config.toml to docker.toml and update the baseURL setting (as well as any other settings as desired), and use RUN hugo --config docker.toml instead.
You can find more information on setting up a Dockerfile in the Dockerfile Reference.
Build Docker on GitLab
Docker images can be built using GitLab. The organization or repository on GitLab must be configured with a GitLab Runner. This has already been done in most GitLab organizations on the CS GitLab server that contain textbooks.
Create the file .gitlab-ci.yml in the site’s base directory with the following content:
image: docker:20.10.11variables:
# When using dind service, you must instruct docker to talk with the# daemon started inside of the service. The daemon is available with# a network connection instead of the default /var/run/docker.sock socket.## The 'docker' hostname is the alias of the service container as described at# https://docs.gitlab.com/ee/ci/docker/using_docker_images.html#accessing-the-services## If you're using GitLab Runner 12.7 or earlier with the Kubernetes executor and Kubernetes 1.6 or earlier,# the variable must be set to tcp://localhost:2375 because of how the# Kubernetes executor connects services to the job container# DOCKER_HOST: tcp://localhost:2375#DOCKER_HOST: tcp://docker:2375## This instructs Docker not to start over TLS.DOCKER_TLS_CERTDIR: ""# # Checkout submodules recursivelyGIT_SUBMODULE_STRATEGY: recursiveservices:
- docker:20.10.11-dindbefore_script:
- docker info - docker login -u $CI_REGISTRY_USER -p $CI_REGISTRY_PASSWORD $CI_REGISTRYbuild-latest:
stage: buildonly:
- tagsscript:
- docker pull $CI_REGISTRY_IMAGE:latest || true - docker build --cache-from $CI_REGISTRY_IMAGE:latest --tag $CI_REGISTRY_IMAGE:$CI_COMMIT_SHA --tag $CI_REGISTRY_IMAGE:latest . - docker push $CI_REGISTRY_IMAGE:$CI_COMMIT_SHA - docker push $CI_REGISTRY_IMAGE:latest# build-branches:# stage: build# except:# - master# - main# script:# - docker pull $CI_REGISTRY_IMAGE:$CI_COMMIT_BRANCH || true# - docker build --cache-from $CI_REGISTRY_IMAGE:latest --tag $CI_REGISTRY_IMAGE:$CI_COMMIT_SHA --tag $CI_REGISTRY_IMAGE:$CI_COMMIT_BRANCH .# - docker push $CI_REGISTRY_IMAGE:$CI_COMMIT_SHA# - docker push $CI_REGISTRY_IMAGE:$CI_COMMIT_BRANCH
Update the following items in this file to match your desired configuration:
Under the build-latest job, it uses - tags under the only heading. This will only build a Docker container when a new tag is pushed. This reduces the number of containers built, since it is a time-consuming job. You can change this to the following to have it build anytime changes are made to the main or master branches:
only:
- main - master
You can also enable additional jobs:
The build-branches job is commented out. This will build a Docker container for each branch that is tagged using the branch name. This can be uncommented if you’d like to build Docker containers based on a branch. (Likewise, the except section can be replaced with an only section to target specific branches.)
You should also enable package cleanup in GitLab by going to the Settings -> Packages and Registries menu in the repository and turning on Clean Up Image Tags. This will clean up all tags older than 90 days, except for the last 10 tags. The latest tag will be kept indefinitely until replaced by a new version. This will help save space on GitLab as images are built and replaced.
Build Docker on GitHub
Docker images can be built using GitHub.
Create a file .github/worflows/docker-image.yml with the following content:
Update the following items in this file to match your desired configuration:
Under the push heading, it is configured to run this only when a new tag is pushed that matches Semantic Versioning structure. You can change this to the following to have it build anytime changes are made to the main or master branches:
push:
branches: [ master, main ]
This can also be configured to send notifications to Discord on a successful deployment, and it can also trigger a webhook after deployment. See this example for how to configure those options. It requires creation of GitHub Action Secrets for the Discord webhook and deployment webhook.
As of this writing, GitHub will store all previous versions of this package, and there is no automatic way to delete older packages outside of using another GitHub action. So, if you choose to go this route, you may have to deal with manually cleaning up old packages at some point in the future if you run out of space on GitHub.
Update 2023
In Summer 2023 this theme was updated to match version 5.18.0 of the base Hugo Relearn Theme
New Features
A full list of changes to the theme can be found on the What’s New page and in the Documentation.
Currently the template will sometimes include hidden pages in the menu when using hugo serve locally, but this does not affect any deployed versions of the site. To resolve this problem, disable fast rendering using hugo serve --disableFastRender.
Upgrading
To upgrade to the new theme version, do the following:
Navigate to the themes/hugo-theme-relearn directory
Use git pull to pull the latest version of the theme
Navigate back to the root directory of your site.
Commit and push the site. It should see a new version of the themes/hugo-theme-relearn submodule.
Enable Search
To enable the new search features, update the [outputs] section of the config.toml (and other files like docker.toml and github.toml if present) to the following:
To enable automatically detecting theme variants based on the user’s OS preferences, find the themeVariant item under [params] in the config.toml (and other files like docker.toml and github.toml if present) and replace that line with the following:
themeVariant = ["auto", "light-theme", "dark-theme"]
# The first element is the variant for light mode, the second for dark modethemeVariantAuto = ["light-theme", "dark-theme"]
Deprecated Chapter Features
Many of the previous textbooks use the old method for creating chapters by placing chapter = true in the frontmatter. This has been deprecated in favor of using the new archetype = "chapter" setting. See the documentation for details.
Unfortunately, the way that the new archetype system assigns chapter numbers is using the weight parameter. Many of our books use non-sequential weights to make it simpler to add pages later. This theme adds support for an ordinal value in the frontmatter to allow overriding this value.
To get rid of the deprecation warnings, find all pages that contain chapter = true and make the following updates:
Replace chapter = true with archetype = "chapter" in the page’s frontmatter
Remove the top-level headers. Typically these pages would include an h1 and h3 header. These are now generated by the archetype.
OPTIONAL: Add an ordinal = "X" line to the frontmatter, and replace the X with the chapter number.
For example, a chapter with the following content:
+++
title = "Basic Content"
weight = 5
chapter = true
pre = "<b>0. </b>"
+++
### Chapter 0
# Basic Content
The Basics of this Template
should be updated to match this format:
+++
title = "Basic Content"
weight = 5
ordinal = "0"
archetype = "chapter"
pre = "<b>0. </b>"
+++
The Basics of this Template
Update 2024
In Summer 2024 this theme was updated to match version 6.0.0 of the base Hugo Relearn Theme
New Features
A full list of changes to the theme can be found on the What’s New page and in the Documentation.
Configuration file moved from config.toml to hugo.toml to match Hugo changes
Lots of theme configuration options were added to hugo.toml
In addition, the theme now supports installation via Hugo Modules as well as Git Submodules. We plan to migrate all textbooks to a Hugo Modules setup since it is more portable and easy to configure. More Information.
Upgrading and Switching to Hugo Modules
To Upgrade the theme and switch from a Git Submodule to a Hugo Module, do the following:
Ensure that a recent version of Go and Git is installed.
Initialize the Hugo Module system. The name of the module doesn’t matter since it won’t be used - just use the name of the repository, such as hugo mod init cis598-textbook. This should create a file go.mod listing the name of the module and the version of go used.
The module import is already defined at the bottom of the new hugo.toml file and doesn’t need to be configured.
In the textbook directory, remove the submodule using git rm themes/hugo-theme-relearn. This should remove that directory as well as update the .gitmodules file to remove the submodule. If desired, also delete the themes directory itself using rmdir themes.
Create a new file hugo.toml using this sample file as a template.
Look for items labelled # TODO changeme to see what settings should be updated for each site. Many settings can be carried over from the existing config.toml but some settings are new. Configuration Documentation.
One recommendation is to use the Todo Tree extension in VS Code, which will highlight comments containing TODO and other keywords, making them easy to find.
The theme has changed how URLs are handled for sites served in subdirectories (such as textbooks.cs.ksu.edu/cis598). The canonifyURLs setting is deprecated and should be set to false, along with the relativeURLs setting set to false. This may break some image links - see below.
Once the configuration is updated in hugo.toml, delete the existing config.toml as it is no longer needed.
Install the Hugo module using hugo mod get -u. This should install the module and create a file go.sum that includes the checksums of the module dependencies.
In the future, use hugo mod get to get the current version specified, or hugo mod get -u to update the version to the latest in GitHub.
Running hugo serve or hugo build will also install the module if needed.
Check for files such as Dockerfile, .github/workflows/gh_pages.yml, .gitlab-ci.yml or similar and update the version of Hugo to v0.126.1.
Sample Dockerfile that works with Hugo modules instead of git submodules.
Before testing the site, there are a few content changes that must be made.
Content Changes
Updates to ref and relref shortcode
In newer versions of Hugo, the ref and relref shortcode must be delimited using % % instead of < >. Many of our textbooks use the old delimiter. This will result in errors such as this when building the textbook:
ERROR "/home/russfeld/web/cis598-textbook/content/0-introduction/01-syllabus/_index.md": link 'HAAHUGOSHORTCODE14s0HBHB' is not a page
WARN "/home/russfeld/web/cis598-textbook/content/b-schedule/01-fall2022.md": WARNING you must call the ref / relref shortcode with '% %' instead of '< >' to work correctly for the anchor target attribute
To fix this, the following regex find/replace can be used in VS Code:
Search:
\{\{<\s*(rel)?ref ([^>]*)\s*>\}\}
Replace:
{{% $1ref $2 %}}
These errors can be switched to warnings in hugo.toml but it is best to deal with them directly so they don’t cause problems in the future.
Updates to youtube shortcode
The youtube shortcode may also need to be updated as described above, but in the other direction.
To fix this, the following regex find/replace can be used in VS Code:
Search:
\{\{%\s*youtube (.*)\s*%\}\}
Replace:
{{< youtube $1 >}}
Updates to Images and Other Resources
Newer versions of Hugo can also verify the path of any images and resources included in the page. This is helpful for finding broken links or missing images. Unfortunately, it cannot verify any items stored in the static directory since it is not processed through the content pipeline. Many of our textbooks store all images and resources in the static folder, which is fine, but it means that the build process cannot verify that there aren’t any missing items or broken links.
To fix this, there are a few options:
In hugo.toml, the errors can be switched to warnings or disabled entirely. By default, all checks are set to error except for images, which are set to warning. Read the documentation in hugo.toml to determine what options are preferred.
Images and resources in the static folder can be moved to the assets folder. Ideally the links won’t need to be changed if the images are linked using an absolute reference path (e.g. images/1/image.png). This is the simplest fix
Images and resources in the static folder can be moved to the content folder near the page where they are used. It is recommended to convert any standalone pages to page bundles that contain the page and all associated resources.
For example, the CIS 598 textbook contains a page 01-fall2022.md that contains links to many images in the static folder:
To switch this to a page bundle, create a folder 01-fall2022 and then move the 01-fall2022.md file inside of that folder and rename it to index.md. Then, create an images folder within, and move all of the images from static to the new folder. The resulting layout should be:
Using this method, all image links on the page can be updated by a quick find and replace to replace /images/fall2022/ with just images/ - removing the leading slash / and the subfolder name used in the old static/images path.
Image Links in Reveal.js Slides
Disabling the canonifyURLs option will break all image links in any Reveal.js slides that are using the /images path prefix. The previous behavior would simply prepend the subdirectory in front of any URL starting with a /.
There are two workarounds:
A quick fix is to a find/replace for the /images/ path in the slides and prepend the subdirectory to the path, as in /cis598/images/. This works as long as the site baseURL is not changed. This requires the images to remain in the static folder unless they are referenced by other markdown files. Generally I just copy images from static to assets to fix the problem above but leave a copy in the static folder as well. Hugo will merge the two.
Another workaround would be to move the images into a page bundle as described above, and then convert the /images URLs to be ../images (or whatever relative path is correct). The ref and relref shortcodes cannot be used in this context. This works regardless of the site baseURL setting.
Image Link in Logo Template
If the site includes an image in the layouts/partials/logo.html page, you can suppress the error by loading the image as a resource from the assets directory instead of the static directory.
{{/* Place Logo Graphic or Text Here */}}
{{ $image := resources.Get "images/cc410logo.png" }}
<aid="logo"href="{{ .Site.Home.RelPermalink | default ("/"|relLangURL)}}">
<imgsrc="{{ $image.RelPermalink }}"alt="Computational Core Logo"style="width: 100%">
</a>
Update 2025
In Summer 2025 this theme was updated to match version 8.0.0 of the base Hugo Relearn Theme
Updated Hugo Version
The new version of the theme was tested on Hugo v0.148.1 or later. I recommend updating your Hugo installation (either locally or by updating the devcontainer configuration and rebuilding).
New Features
A full list of changes to the theme can be found on the What’s New page and in the Changelog.
If the repository includes a devcontainer, update the image in .devcontainer/devcontainer.json. After updating, you’ll need to rebuild the devcontainer to get the new version of Hugo.
If the repostiroy includes a GitHub Pages action, update the version in .github/workflows/gh-pages.yml
Confirm the Hugo version in the terminal: hugo version
In the repository folder, update the Hugo module for the theme: hugo mod get -u
Update hugo.toml using this sample file as a template.
Look for items labelled # TODO changeme to see what settings should be updated for each site. Many settings can be carried over from the existing config.toml but some settings are new. Configuration Documentation.
Render the site and check for any errors: hugo serve
If everything looks good, commit and push.
After a few minutes, check the deployed version and make sure it has updated. Clear the cache (CTRL + F5) and look for version 8.0.0 in the footer.


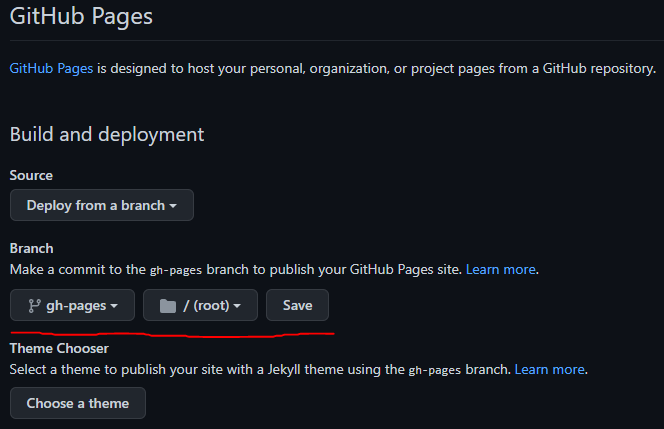
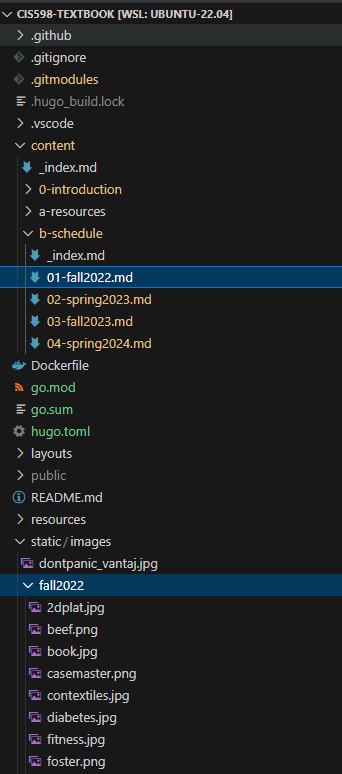
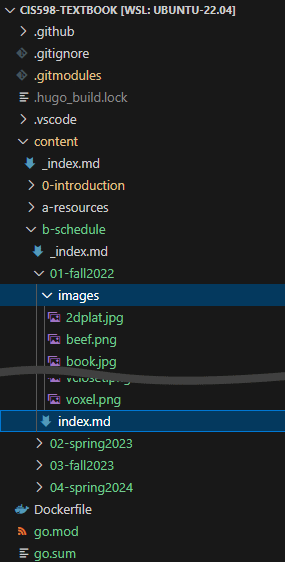